
I wrote Part I of the Developing on a Mac series to provide a foundation upon which to build a collection of minimal guides to developing software on a Mac. In this post let’s look at what needs to be installed on your Mac for delving into Machine Learning with Python. If you haven’t read Part I, make sure you do and at least install the macOS Developer Tools.
I’ve used macOS Monterrey and Sonoma to develop and test the instructions in this post, but they should apply to Ventura as well.
Python and Virtual Environments
Python is an ideal language to begin exploring machine learning. But, like its programming language cousins, it is real easy to get wrapped around the axle with maintaining multiple versions of interpreters and libraries and sorting out conflicts. Fortunately we can use the Python module venv.
Some muscle memory will come in handy here, and I recommend you memorize the following:
|
1 2 3 4 5 6 |
mkdir my_project cd my_project python3 -m venv venv source venv/bin/activate pip3 install -r requirements.txt rehash |
Let’s look at each line in detail. First, we’re going to create a directory where we’ll be “doing our work” or “our project”. The “magic incantation” here is python3 -m venv venv which creates a Python3 virtual environment in the directory venv. Now, you could name venv (the second one) whatever you like. For example, python3 -m venv my_virtual_environment.
Once your virtual environment is created, activate it with source venv/bin/activate. If you named your virtual environment my_virtual_environment you’d execute source my_virtual_environment/bin/activate.
Once your environment is activated, install required libraries with pip3 install -r requirements.txt. requirements.txt is an actual file you’ll list your dependencies in; we’ll get to that in a moment.
Finally, we execute the shell built-in rehash to rebuild the hash table used to look up the location of binaries. This is important for us because when we begin installed Python modules that have binaries associated with them (such as jupyter) we want to use the virtual environment path, and not something like, say, Homebrew.
Project Dependencies
Now, let’s install some Python packages we use for machine learning. I really prefer to use requirements.txt and enumerate all of the Python packages I’m going to install for whatever I’m working on. There are a few common ones I’ve used for machine learning exercises:
|
1 2 3 4 |
pandas numpy jupyter scikit-learn |
Write all four of these in a text file named requirements.txt and then type:
pip3 install -r requirements.txt
Now, type rehash.
Editor’s Note: Strictly speaking one doesn’t need to include numpy as pandas relies on it and will include it.
Once everything is installed (and you’ve run rehash), type which jupyter.
|
1 2 3 |
% which jupyter /Users/joe/projects/my_project/venv/bin/jupyter |
You should see that the jupyter binary is in your virtual environment.
The Easiest Regression Exercise Ever
Let’s use our virtual Python environment with Jupyter Notebook, Pandas, Numpy and Scikit Learn.
The following Python one-liner “generates” the function
$$f(x) = 3x + 27$$
for x in 1 through 9.
|
1 2 3 4 5 6 7 8 9 10 11 12 13 |
% python3 -c 'for i in range(1,10): print("%d,%d" % (i,3*i+27))' > regression.csv % cat regression.csv 1,30 2,33 3,36 4,39 5,42 6,45 7,48 8,51 9,54 |
Editor’s Note: If you’re in a particularly punchy mood, try
|
1 |
python3 -c 'import random; [print("%d,%f" % (i,3*i+27+10*random.random())) for i in range(1,10)]'>regression.csv |
to create a dataset whose correlation coefficient r is not 1.
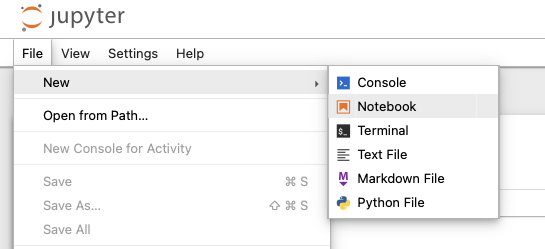
Create a Jupyter notebook by running jupyter notebook& in your terminal window, and then, when the Jupyter homepage comes up, go to File – New – Notebook.
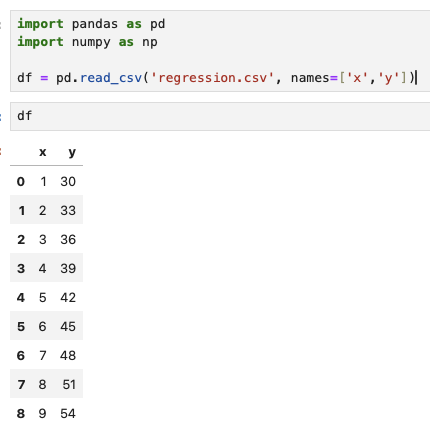
Doubleclick on the newly created notebook to open it, and in the first cell add:
|
1 2 3 4 |
import pandas as pd import numpy as np df = pd.read_csv('regression.csv', names=['x','y']) |
In a new cell, add:
|
1 2 3 4 5 6 7 8 9 10 |
from sklearn.linear_model import LinearRegression from sklearn.model_selection import train_test_split train, test = train_test_split(df) train_X = train['x'] train_y = train['y'] reg = LinearRegression() reg.fit(np.array(train_X).reshape(-1,1), train_y) |
I won’t go into the details of Scikit Learn, but you should be able to gather that we are going to train a linear regression model that, given new x values, should be able to predict y values. Since our data fits a perfect line, we’d expect pretty good predictions. As in perfect ones!
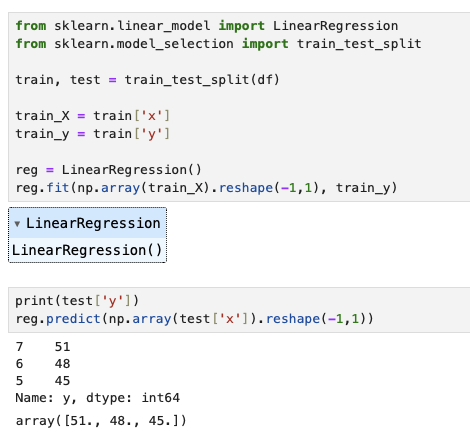
In a new cell, add:
|
1 2 3 |
some_x = np.array([[20], [30], [40]]) reg.predict(some_x) |
and the result should be array([ 87., 117., 147.]).
Nifty!
Wait, That’s It?
Not quite! Our linear regression algorithm doesn’t take long on any computer, much less a MacBook Pro. It is also rather boring. Let’s look at something far more intensive and interesting: image classification using a deep learning convolutional neural network.
Create a new directory, something like ~/projects/imageclassifier and create a Python virtual in it:
|
1 2 3 4 5 |
cd ~/projects/ mkdir imageclassifier cd imageclassifier python3 -m venv venv source venv/bin/activate |
In a requirements.txt file add one line for now:
|
1 |
tensorflow |
|
1 2 |
pip3 install -r requirements.txt rehash |
We’re going to use Apple’s own test script for verifying TensorFlow is correctly installed:
|
1 2 3 4 5 6 7 8 9 10 11 12 13 |
import tensorflow as tf cifar = tf.keras.datasets.cifar100 (x_train, y_train), (x_test, y_test) = cifar.load_data() model = tf.keras.applications.ResNet50( include_top=True, weights=None, input_shape=(32, 32, 3), classes=100,) loss_fn = tf.keras.losses.SparseCategoricalCrossentropy(from_logits=False) model.compile(optimizer="adam", loss=loss_fn, metrics=["accuracy"]) model.fit(x_train, y_train, epochs=5, batch_size=64) |
Editor’s note: You can read more about the CIFAR100 dataset here.
Save the above code in a file named imageclassifier.py or something like that, and run it.
|
1 2 3 4 5 6 7 8 9 10 11 12 |
time python3 imageclassifier.py Epoch 1/5 782/782 [==============================] - 320s 407ms/step - loss: 4.8848 - accuracy: 0.0618 Epoch 2/5 782/782 [==============================] - 317s 405ms/step - loss: 4.3662 - accuracy: 0.0966 Epoch 3/5 782/782 [==============================] - 306s 391ms/step - loss: 3.8930 - accuracy: 0.1386 Epoch 4/5 782/782 [==============================] - 304s 388ms/step - loss: 3.7569 - accuracy: 0.1514 Epoch 5/5 782/782 [==============================] - 309s 396ms/step - loss: 3.5246 - accuracy: 0.1892 python3 imageclassifier.py 4922.85s user 1125.25s system 386% cpu 26:05.16 total |
Yikes! That took nearly 25 minutes on a 12-core CPU.
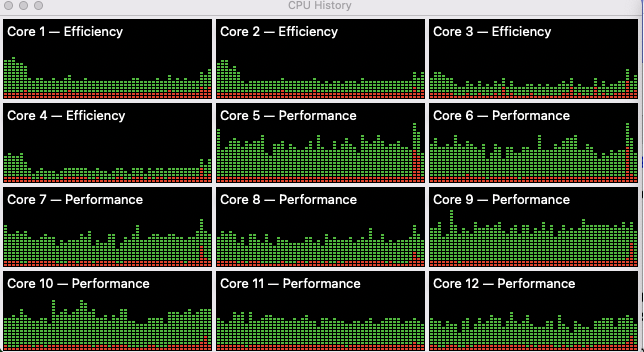
Tensorflow Metal to the Rescue
Fortunately we have access to our Mac’s GPU through TensorFlow Metal. In your requirements.txt file, add tensorflow-metal and run pip3 install -r requirements.txt again.
|
1 2 3 4 5 6 7 8 9 10 11 12 |
time python3 imageclassifier.py Epoch 1/5 782/782 [==============================] - 49s 59ms/step - loss: 4.6411 - accuracy: 0.0827 Epoch 2/5 782/782 [==============================] - 45s 58ms/step - loss: 4.2062 - accuracy: 0.1202 Epoch 3/5 782/782 [==============================] - 46s 58ms/step - loss: 3.7102 - accuracy: 0.1712 Epoch 4/5 782/782 [==============================] - 47s 60ms/step - loss: 3.5657 - accuracy: 0.1978 Epoch 5/5 782/782 [==============================] - 46s 59ms/step - loss: 3.2704 - accuracy: 0.2424 python3 imageclassifier.py 226.09s user 56.42s system 119% cpu 3:56.26 total |
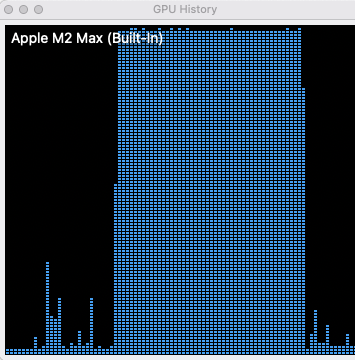
A bit under four minutes, and we’re done. The GPU got a workout.
Conclusion
What I really want to stress in this post is the general pattern for Python development on the Mac:
- create a project directory
- create a Python virtual environment with
python3 -m venv venv - activate the environment with
source venv/bin/activate - install required Python packages with
pip3 install -r requirements.txtin your virtual environment - issue
rehashto ensure any commands typed on the command line will be found in your virtual environment!
It really is “that easy” (famous last words)!