So far in our series we’ve covered some fundamental Ansible basics. So fundamental, in fact, that we really haven’t shared anything that hasn’t been written or covered before. In this post I hope to change that with an example of creating an AWS RDS database (MySQL-powered) solely within an Ansible playbook.
If you’re new to this series, we’re building up an Ansible playbook one step at a time, starting with Part 1. Check out the Github repository that accompanies this series to come up to speed. The final result of this post will be on the part4 branch.
Prerequisites
First, some prerequisites, you’ll need to:
- generate a MySQL password
- pick a MySQL administrator username
- create an IAM user in S3 for RDS access
I love this page for one-liner password creation. Here’s one that works nicely on macOS:
[code lang=text]
date +%s | shasum -a 256 | base64 | head -c 32 ; echo
[/code]
Whatever you generate will go in your vault file, and for this post we’ll create a new vault file for our staging group.
IAM User
We’re going to use an AWS IAM user with programmatic access to create the RDS database for us. I’m just going to name mine RDSAdministrator and directly attach the policy AmazonRDSFullAccess. Capture your access key and secret access key for use in the vault.
Reorganizing Our Variables
I mentioned in Part 2 that like code, playbooks will invariably be refactored. We’re going to refactor some bits now!
There’s a special group named all (we’ve used it before), and we’re going to use it with our RDS IAM credentials. This is worth paying particularly close attention to.
In group_vars we’ll create two directories, all and staging. staging.yml that we had before will be renamed to staging/vars.yml. all will have a special file named all.yml and both all and staging directories will contain a vault file, so in the end we have something like this:
[code lang=text]
group_vars/
|
+-all/
| |
| |-all.yml
| +-vault
|
+-staging/
|
|-vars.yml
+-vault
[/code]
This is important. The use of all and all.yml is another bit of magic. Don’t rename all.yml to vars.yml, it will not work!
Let’s recap what variables we’re placing in each file and why:
| Variable | Location | Rationale |
|---|---|---|
AWS_RDS_ACCESS_KEY |
group_vars/all/all.yml |
IAM access credentials to RDS will apply to all groups (staging, production, etc.) |
AWS_RDS_SECRET_KEY |
group_vars/all/all.yml |
IAM access credentials to RDS will apply to all groups (staging, production, etc.) |
AWS_RDS_SECURITY_GROUP |
group_vars/all/all.yml |
Our security group allowing access to created MySQL databases will apply to all Ansible groups |
OPERATING_ENVIRONMENT |
group_vars/staging/vars.yml |
The OPERATING_ENVIRONMENT is set to staging for all servers in that group |
MYSQL_ADMIN_USERNAME |
group_vars/staging/vars.yml |
Staging servers will utilize the same MySQL credentials |
MYSQL_ADMIN_PASSWORD |
group_vars/staging/vars.yml |
Staging servers will utilize the same MySQL credentials |
HOSTNAME |
host_vars/ |
Each host has its own hostname, and thus this goes into the host_vars |
AWS_S3_ACCESS_KEY |
host_vars/ |
IAM access credentials to read S3 buckets is currently limited to a single host |
AWS_S3_SECRET_KEY |
host_vars/ |
IAM access credentials to read S3 buckets is currently limited to a single host |
This is our current organization. Over time we may decide to limit the RDS IAM credentials to a specific host, or move the S3 IAM credentials to the staging group.
RDS
Amazon’s Relational Database Service is a powerful tool for instantiating a hosted relational database. With several different types of database engines to choose from I expect increased usage of RDS, especially by smaller shops that need to reserve their budget for focusing on applications and less on managing infrastructure items such as databases.
If you’ve never used RDS before, I highly suggest you go through the AWS Management Console and create one by hand before using an Ansible playbook to create one.
MySQL Access Security Group
We’re going to cheat here a bit, only because I haven’t had the opportunity to work with EC2 security groups with Ansible. But to continue on we’re going to need a security group that we’ll apply to our database instance to allow traffic on port 3306 from our EC2 instances.
I’ve created a group called mysql-sg and set the Inbound rule to accept traffic on port 3306 from any IP in the 172.31.0.0/16 subnet (which covers my account’s default VPC address range).
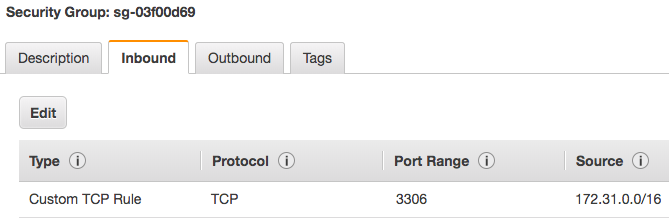
Note: If you have abandoned the default VPC in favor of a highly organized set of VPCs for staging, production, etc. environments, you’ll want to adjust this.
Pip and Boto
The Ansible AWS tasks rely on the boto package for interfacing with the AWS APIs (which are quite extensive). We will want to utilize the latest boto package available and install it through pip rather than apt-get install. The following tasks accomplish this for us:
|
1 2 3 4 5 6 7 8 9 |
# Install Python modules for AWS tasks - name: Install pip apt: name: python-pip state: present - name: Install Python modules for AWS tasks pip: name: boto state: present |
rds Module
Finally, we’ve come to the all-important RDS module! Our previous Ansible modules have been straightforward with just a couple of parameters (think apt, hostname, etc.). The rds module requires a bit more configuration.
Here’s the task and then we’ll discuss each of the parameters.
|
1 2 3 4 5 6 7 8 9 10 11 12 13 14 15 16 17 18 |
# Create Amazon RDS database - name: Create AWS RDS database rds: aws_access_key: "{{ AWS_RDS_ACCESS_KEY }}" aws_secret_key: "{{ AWS_RDS_SECRET_KEY }}" command: create db_engine: MySQL region: us-east-2 instance_name: "{{ OPERATING_ENVIRONMENT }}-mysql" instance_type: db.t2.micro username: "{{ MYSQL_ADMIN_USERNAME }}" password: "{{ MYSQL_ADMIN_PASSWORD }}" size: 10 publicly_accessible: no vpc_security_groups: "{{ AWS_RDS_SECURITY_GROUP }}" wait: yes wait_timeout: 900 register: rds |
This is minimal number of parameters I’ve found to be required to get a functioning RDS database up-and-running.
The aws_access_key and aws_secret_key parameters are self-explanatory, and we provide the RDS IAM credentials from our encrypted vault.
The command parameter used here is create, i.e., we are creating a new RDS database. db_engine is set to MySQL since we’re going to be use MySQL as our RDS database engine. Let’s take a look at the rest:
region– like many AWS services, RDS databases are located in specific regions.us-east-2is the region we’re using in this series. For a complete list of regions available for RDS, see Amazon’s documentation.instance_name– our RDS instance needs a nameinstance_type– the RDS instance type.db.t2.microis a small free-tier eligible type. For a complete list of instance classes (types), see Amazon’s documentation.username– our MySQL administrator usernamepassword– our MySQL administrator passwordsize– the size, in GB, of our database. 10GB is the smallest database size one can create (try going lower)
The next two parameters publicly_accessible and vpc_security_groups dictate who can connect to our RDS database instance. We don’t want our database to be publicly accessible; only instances within our VPC should be able to communicate with this database, so we set publicly_accessible to no. However, without specifying a security group for our instance, no one will be to talk to it. Hence, we specify that our security group created above is to be applied with the vpc_security_groups parameter.
Creating an RDS database takes time. For our db.t2.micro instance, from initial creation to availability took about 10 minutes. To prevent an error such as Timeout waiting for RDS resource staging-mysql we increased our wait_timeout from 300 seconds (5 minutes) to 900 seconds (15 minutes).
register
You’ll notice we snuck in a new parameter to our rds task called register. register is the Ansible method of storing the result of a task in order to use it later in the playbook. The rds task provides a considerable amount of detailed output that is useful to us, the least of which is the endpoint name of the RDS database we just created. That’s important to know! We’ll use this to create a database in our new MySQL instance with the mysql_db task.
Like the rds task, mysql_db has a few dependencies. For it to function you’ll want to add the mysql-python pip package, which in turn requires libmysqlclient-dev (not including libmysqlclient-dev will throw a mysql_config not found error). This can be accomplished with:
|
1 2 3 4 5 6 7 8 9 10 11 12 |
- name: Install MySQL dependencies apt: name: "{{ item }}" state: present with_items: - libmysqlclient-dev - mysql-client - name: Install Python modules for MySQL tasks pip: name: mysql-python state: present |
Including mysql-client was not, strictly speaking, required, but it’s a handy package to have installed on a server that accesses a database.
Creating a MySQL database with Ansible
Now that we’ve created our RDS instance, let’s create a database in that instance with Ansible’s mysql_db task.
|
1 2 3 4 5 6 7 |
- name: Create MySQL database mysql_db: login_host: "{{ rds.instance.endpoint }}" login_user: "{{ MYSQL_ADMIN_USERNAME }}" login_password: "{{ MYSQL_ADMIN_PASSWORD }}" name: helloworld state: present |
Remember that register: rds on the rds task is what allows us to use rds.instance.endpoint (for grins you might put in a debug task to see all of the information the rds task returns). We provide our MySQL username and password (this is to login to the RDS instance), and the name of the database we want to create. present is the default for the state parameter, but I like to include it anyway to be explicit in the playbook as to what I’m trying to accomplish.
There are a lot of parameters for the mysql_db module, so make sure and check out the Ansible documentation.
Configuration Information
Undoubtedly we’re going to provide our software with access to the database, and knowing it’s endpoint is important. Let’s save this information to our /etc/environment by adding the following line to templates/environment.j2:
|
1 |
MYSQL_ENDPOINT='{{ rds.instance.endpoint }}' |
Note that since we’re going to be referencing the output of the rds task in this template we will want to move writing out /etc/environment to the end of the playbook.
If desired, we can also create a .my.cnf file for the ubuntu user that provides automated access to the database. Now, it’s up to you to decide whether or not you’re comfortable with the idea of the password included in .my.cnf; if you aren’t, simply remove it. To create .my.cnf we’ll introduce one additional new module, blockinfile.
|
1 2 3 4 5 6 7 8 9 10 11 12 |
# Create .my.cnf - name: Create .my.cnf blockinfile: create: yes path: /home/ubuntu/.my.cnf owner: ubuntu group: ubuntu block: | [client] host="{{ rds.instance.endpoint }}" user="{{ MYSQL_ADMIN_USERNAME }}" password="{{ MYSQL_ADMIN_PASSWORD }}" |
blockinfile allows you to add blocks of text to either an existing file, or if you specify create: yes as shown here, will create the file and add the provided content (given in the block parameter).
You can see how running this task performs:
[code lang=text]
ubuntu@helloworld:~$ cat .my.cnf
# BEGIN ANSIBLE MANAGED BLOCK
[client]
host="staging-mysql.c8tzlhizx66z.us-east-2.rds.amazonaws.com"
user="mysqladmin"
password="<Our MySQL administrator password>"
# END ANSIBLE MANAGED BLOCK
ubuntu@helloworld:~$ mysql
Welcome to the MySQL monitor. Commands end with ; or \g.
Your MySQL connection id is 83
Server version: 5.6.39-log MySQL Community Server (GPL)
[/code]
Recap
We’ve covered a lot of ground in this post! Several new modules, refactoring our variables, using Amazon’s RDS service. Whew! Here’s a quick recap of the new modules that you’ll want to study:
rds– you can create, modify, and delete RDS instances in your AWS account through this powerful taskregister– theregisterkeyword allows you to capture the output a task and use that output in subsequent tasks in your playbookmysql_db– once your RDS instance is created, add a new database to it with themysql_dbtaskblockinfile– another great task to have in your Ansible arsenal,blockinfilecan add blocks of text to existing files or create new ones
This Series
Each post in this series is building upon the last. If you missed something, here are the previous posts. We’ve also put everything on this Github repository with branches that contain all of the changes from one part to the next.

I’ve only had time to read through Part 1 fully (nice job so far), but there’s a long-standing bug in Ansible with Macs that impacts boto and a few other packages. You should take a look at:
https://github.com/ansible/ansible/issues/15019
There are multiple work-arounds available, but no fixes yet (presumably thanks to an idiot that closed it thinking it was a question instead of a bug report).
Cheers!
Thanks for the heads-up Jay, I’ll take a look!