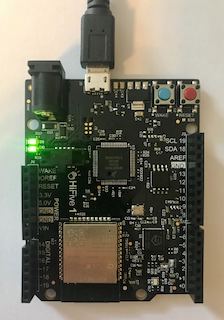
Today I’d like to introduce you to a new development board, the HiFive1 Rev B. Equipped with a RISC-V Freedom E310 microcontroller and designed with an Arduino Uno “form factor”, the HiFive1 Rev B is a neat little board that I hope to learn and develop for.
There is a lot of material out there about RISC-V and how it is going to change the future of CPUs, but what attracted me to it was the notion of a completely open standard Instruction Set Architecture (ISA). That and I think working with new hardware and development environments is cool.
Getting Started
The Getting Started Guide is crucial to read. If you’re anything like me you want to dig in as quickly as possible with as little reading as possible, but trust me, reading the guide first is very useful.
You don’t get anything but the HiFive1 Rev B board if you’ve ordered it from Crowd Supply and will need a trusty USB-A male to USB-micro-B male cable. This connection can be used for both serial communication and power. Of course, if you have only a system with USB-C you’ll need some set of adapters to get to USB micro-B.
For the host platform we will be using a MacBook Pro (Retina, 13-inch, Early 2015) running macOS 10.15 (Catalina). Hopefully if you’re reading this with the intention of working on the HiFive1 with your Macbook Pro you’ll already have the best terminal program ever installed, but if you don’t regular Terminal.app works.
Let’s see our boot screen first:

To see this boot screen you’ll need to use a serial terminal program. macOS is going to present the HiFive as the two USB modem devices in the /dev directory.
|
1 2 3 4 |
ls -1 /dev/cu* /dev/cu.Bluetooth-Incoming-Port /dev/cu.usbmodem0009790151821 /dev/cu.usbmodem0009790151823 |
The first cu.usbmodem device presented will be the HiFive1, and my suggestion is to open an iTerm and use screen to connect to it. 115200 bps is your speed and the default 8N1 settings should work, so in our case screen /dev/cu.usbmodem0009790151821 115200 is all we had to type in the terminal.
Time to Develop
There are several key pieces of software you’ll need to install on your Mac to begin developing on the HiFive1.
- a toolchain (i.e., the compiler, assembler, linker, and associated libraries)
- OpenOCD On-Chip Debugger
- the Freedom E SDK
- Segger J-Link OB debugger
We’ll take each in turn.
Installing the Toolchain and OpenOCD
The reference toolchain is a GNU Embedded Toolchain — v2019.08.0 and can be downloaded directly from SiFive. Go to the Boards page, scroll down until you see the section labeled Prebuilt RISC-V GCC Toolchain and Emulator.
 Download both the GNU toolchain and OpenOCD packages and untar both into a suitable installation location. I prefer to keep things like this in the
 /opt directory, so we’ll do the same here in /opt/riscv.
|
1 2 3 4 5 |
cd /opt sudo mkdir riscv cd riscv sudo tar xzf ~/Downloads/riscv-openocd-0.10.0-2019.08.2-x86_64-apple-darwin.tar.gz sudo tar xzf ~/Downloads/riscv64-unknown-elf-gcc-8.3.0-2019.08.0-x86_64-apple-darwin.tar.gz |
Before going any further ensure that the compiler can run:
|
1 |
/opt/riscv/riscv64-unknown-elf-gcc-8.3.0-2019.08.0-x86_64-apple-darwin/bin/riscv64-unknown-elf-gcc --version |
You may have received the error message "riscv64-unknown-elf-gcc" cannot be opened because the developer cannot be verified.. Now, this may be controversial, but I don’t hold to my OS telling me what software I can and can’t run, so let’s get rid of that silliness with spctl:
|
1 |
sudo spctl --master-disable |
Let’s try again:
|
1 2 3 4 5 |
/opt/riscv/riscv64-unknown-elf-gcc-8.3.0-2019.08.0-x86_64-apple-darwin/bin/riscv64-unknown-elf-gcc --version riscv64-unknown-elf-gcc (SiFive GCC 8.3.0-2019.08.0) 8.3.0 Copyright (C) 2018 Free Software Foundation, Inc. This is free software; see the source for copying conditions. There is NO warranty; not even for MERCHANTABILITY or FITNESS FOR A PARTICULAR PURPOSE. |
Much better.
Get the SDK
We have a HiFive1 board which uses the Freedom E310 chip, thus will want to get the Freedom E SDK. For this I like to keep the SDK in my projects directory.
|
1 2 3 |
cd ~/projects mkdir sifive git clone --recursive https://github.com/sifive/freedom-e-sdk.git |
Note: You must use --recursive here to check out all of the required packages.
Now, let’s compile that first program!
|
1 2 |
cd ~/projects/sifive/freedom-e-sdk make PROGRAM=hello TARGET=sifive-hifive1-revb |
In the top-level directory freedom-e-sdk is a set of Makefiles that make it easy to compile and generate an image suitable for uploading to the HiFive1 board. In this case, PROGRAM is the name of a subdirectory in freedom-e-sdk/software and TARGET is the board you have.
If this is the first time through you’re going to see a bunch of gibbersh about Python, pip3, virtualenv, etc:
|
1 2 3 4 5 6 |
make PROGRAM=hello TARGET=sifive-hifive1-revb /Applications/Xcode.app/Contents/Developer/usr/bin/make -f scripts/virtualenv.mk virtualenv python3 -m venv /Users/joe/projects/sifive/freedom-e-sdk/venv . /Users/joe/projects/sifive/freedom-e-sdk/venv/bin/activate && /Users/joe/projects/sifive/freedom-e-sdk/venv/bin/python3 /Users/joe/projects/sifive/freedom-e-sdk/venv/bin/pip install pip==20.0.1 Collecting pip==20.0.1 ... |
And, if you receive an error regarding the C compiler cannot create executables, you need to set your RISCV_PATH environment variable to point to the correct toolchain like export RISCV_PATH=/opt/riscv/riscv64-unknown-elf-gcc-8.3.0-2019.08.0-x86_64-apple-darwin'.
|
1 2 3 4 |
configure: error: in `/Users/joe/projects/sifive/freedom-e-sdk/bsp/sifive-hifive1-revb/build/debug': configure: error: C compiler cannot create executables See `config.log' for more details make: *** [/Users/joe/projects/sifive/freedom-e-sdk/bsp/sifive-hifive1-revb/build/debug/Makefile] Error 77 |
It’s often a good idea to put the various environment variables in a file such as sifive.env and this source the script into your environment.
sifive.env:
|
1 2 |
export RISCV_PATH=/opt/riscv/riscv64-unknown-elf-gcc-8.3.0-2019.08.0-x86_64-apple-darwin export TARGET=sifive-hifive1-revb |
If everything worked properly you’ll see at the end something like after compiling.
|
1 |
/opt/sifive/riscv64-unknown-elf-gcc-8.3.0-2019.08.0-x86_64-apple-darwin/bin/riscv64-unknown-elf-objcopy -O ihex /Users/joe/projects/sifive/freedom-e-sdk/software/hello/debug/hello.elf /Users/joe/projects/sifive/freedom-e-sdk/software/hello/debug/hello.hex |
Installing J-Link
Now, we’re going to upload this to our board, but we will need the Segger J-Link OB debugger. If it isn’t installed you’ll see something like this when trying to use the upload target.
|
1 2 3 |
scripts/upload --hex /Users/joe/projects/sifive/freedom-e-sdk/software/hello/debug/hello.hex --jlink JLinkExe scripts/upload: line 37: JLinkExe: command not found make: *** [upload] Error 127 |
To get J-Link head over to the download page and grab the J-Link Software and Documentation pack for macOS.
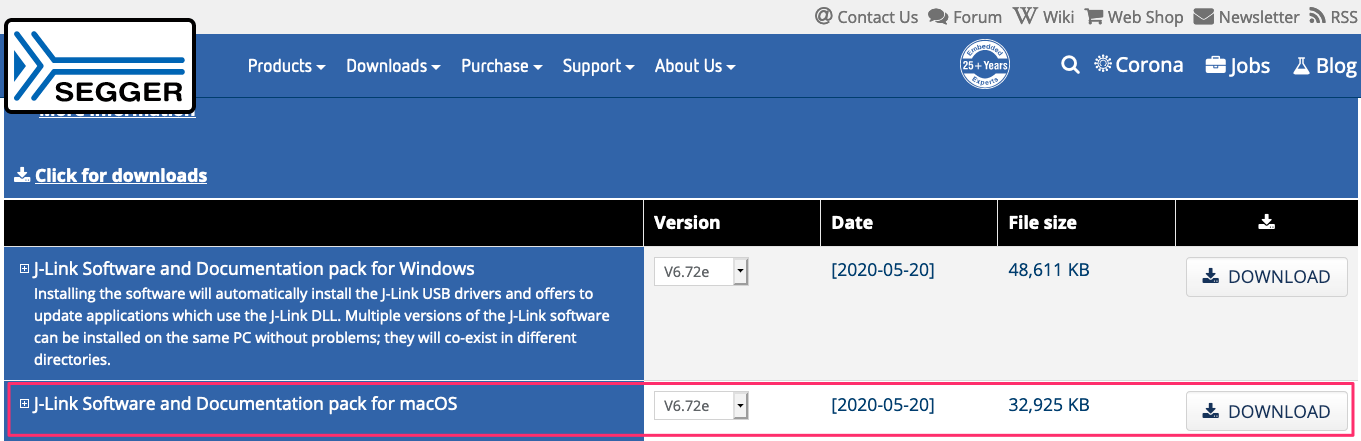
Install per the instructions, and once that is done you can go back to your SDK directory and type:
|
1 |
make PROGRAM=hello TARGET=sifive-hifive1-revb upload |
If everything is installed correctly and the board is attached you’ll see something like:
|
1 2 3 4 5 6 7 8 |
Downloading file [/Users/joe/projects/sifive/freedom-e-sdk/software/hello/debug/hello.hex]... Comparing flash [100%] Done. Erasing flash [100%] Done. Programming flash [100%] Done. Verifying flash [100%] Done. J-Link: Flash download: Bank 0 @ 0x20000000: 1 range affected (65536 bytes) J-Link: Flash download: Total time needed: 1.582s (Prepare: 0.076s, Compare: 0.363s, Erase: 0.144s, Program: 0.619s, Verify: 0.363s, Restore: 0.014s) O.K. |
And that’s it! If you have a terminal window with a connection to the serial output of the board you’ll see Hello, World!.
Your Own C Program
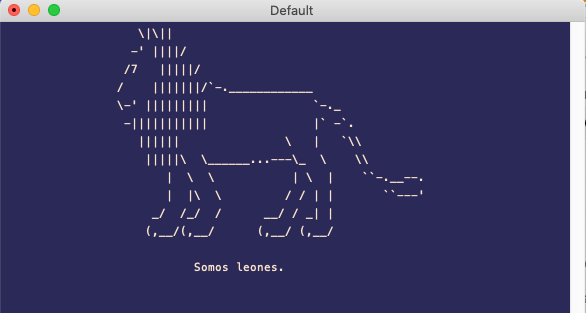
In the directory freedom-e-sdk there is a software folder that has an example template. We’ll use that to create our own ASCII art banner.
Copy the template with something like cp -R software/empty software/leo-welcome and then edit the software/leo-welcome/Makefile to change the PROGRAM name to leo-welcome. Open main.c in the same directory and replace the contents with:
|
1 2 3 4 5 6 7 8 9 10 11 12 13 14 15 16 17 18 19 20 21 22 23 24 |
#include <stdio.h> const char* leo[] = { " \\|\\||", " -' ||||/", " /7 |||||/", "/ |||||||/`-.____________", "\\-' ||||||||| `-._", " -||||||||||| |` -`.", " |||||| \\ | `\\\\", " |||||\\ \\______...---\\_ \\ \\\\", " | \\ \\ | \\ | ``-.__--.", " | |\\ \\ / / | | ``---'", " _/ /_/ / __/ / _| |", " (,__/(,__/ (,__/ (,__/", "", " Somos leones.", NULL }; int main() { printf("\e[1;1H\e[2J"); for (int i = 0; leo[i] != NULL; i++) { printf("\t\t%s\n",leo[i]); } } |
Compile and upload with make PROGRAM=leo-welcome TARGET=sifive-hifive1-revb upload and behold.
Some Assembly
I’ll be honest, I struggled with this part, but that’s primarily due to the school of hard knocks with piecing together the calling convention for RISC-V. Let’s review a few examples.
Hello World in RISC-V Assembly
Again, start off with the example folder inside freedom-e-sdk with something like
|
1 2 |
cd freedom-e-sdk cp -R software/example software/helloasm |
In this case we’re going to write Hello World in assembly so delete software/helloasm/main.c and instead create a file called main.S with the following content.
main.S:
|
1 2 3 4 5 6 7 8 9 |
.global main main: la a0,hellomsg call printf ret .data hellomsg:.asciz "Hello, world!\n" |
In RISC-V the a-registers will contain our procedure arguments, the procedure here being C printf. We use la (load address) to bring the address of the hellomsg label into a0 and then call the printf function. All of these, in reality, are pseudoinstructions.
The Makefile in the template will pick up files with a .S extension, so make PROGRAM=helloasm upload will assemble, link, and upload our file to the HiFive1.
Counting Down
Finally, let’s look at a countdown routine with a max and min. Here things are a bit more complicated as we are going to make use of a prologue and epilogue in our routine. The prologue saves the return address on the stack, and the epilogue loads the address back into the ra register such that the instruction ret will branch back to our caller.
countdown.S:
|
1 2 3 4 5 6 7 8 9 10 11 12 13 14 15 16 17 18 19 20 21 22 23 24 25 26 27 28 |
.global countdown countdown: // Prologue addi sp,sp,-4 // 32-bits to save ra on the stack sw ra,4(sp) // Save mv s0,a0 // s0 - max mv s1,a1 // s1 - min loop: blt s0,s1,end // end if s1 > s0 la a0,count // set up printf mv a1,s0 call printf addi s0,s0,-1 // max <- max - 1 j loop // do while end: mv a0,x0 // Return value of 0 // Epilogue lw ra,4(sp) // Reload ra addi sp,sp,4 // Give back the stack ret .data count:.asciz "%d\n" |
We can call this function with C like this:
main.c:
|
1 2 3 4 5 6 7 8 9 10 |
#include <stdio.h> void countdown(int max, int min); int main(void) { printf("It's the final countdown...\n"); countdown(10, 0); printf("...liftoff!\n"); return 0; } |
Compile and upload!
Good References
There are a lot of great references on RISC-V, its instruction set architecture, and so on. I’ve compiled a few of my favorites here.
- RISC-V Assembly Language Computer Systems Architecture by Stephen Marz
- Introduction to Assembly Language and RISC-V Instruction Set Architecture
- RISC-V Instruction Formats by Steven Ho
- Running a Program with Krste Asanovic & Randy H. Katz
Closing Thoughts and What’s Next
That wraps it up for this first look at the SiFive HiFive1 Rev B board. Of course, we haven’t even talked about the ESP32-based wireless capabilities of the board, haven’t talked about the Freedom Metal library or any of the stuff that will accelerate our development. Perhaps that’s next!
And, if you’ve made it this far, you might want to check out our next post on exploring the HiFive1 GPIO pins.