It’s clear from the Swift tutorials out there (including ours), that folks ask the question “How do I include Objective-C frameworks in my Swift project?” more often than “How do I include Swift code in my Objective-C project?” That’s understandable. Swift is new and shiny and we want to start off playing with Swift first and then mix in some Objective-C when we have to (which if you are using popular frameworks such as AFNetworking, Parse, etc., you have to quickly).
Since there’s plenty of Objective-C bridging header tutorials out there already, I thought I’d share my experience with the reverse direction: adding Swift code to an existing Objective-C project. I’d love to say it was easy and painless, but the reality is it was a pain in the ass (read this Stackoverflow thread to see why!).
Let’s start off the basic rule: Don’t add any Swift files to your project without reading this first. If you have already added Swift files and are scratching your head why things won’t work (namely that your -Swift.h can’t be found), delete them from your project and just start over and follow these steps:
Update Your Project Build Settings
Your project’s (not the target) build settings need to have the flag Defines Module set to YES. Go to your project build settings page and type Packaging in the search field and then set Defines Module to YES.
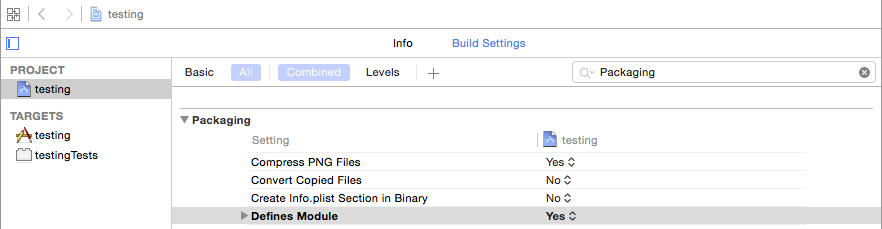
Make Note of Your Product Module Name
Did you even know you had a product module name? I didn’t. To find it go to your target’s (not the project) build settings and again search for Packaging. Make note of the Product Module Name. In our case it is testing.

Create Your Swift File
Create your Swift file with Xcode File – New – File. If Xcode asks whether or not you want to create a bridging header, you can if you like, but it’s not strictly required for what we’re trying to accomplish (Swift in Objective-C not the other way around, which is what the bridging header is for).
The Rules
There are rules around what’s required to get Swift objects living in harmony in your Objective-C code. For a complete overview see Apple’s documentation, but here’s what I’ve found to be true:
- You have to
#import <productModuleName-Swift.h>in every Objective-C class you plan to use your Swift classes in - The
@objcdeclaration on a Swift class isn’t good enough – inherit fromNSObject
The Header File
What others have pointed out in the Stackoverflow post referenced early is that unlike the the Objective-C bridging header the Swift bridging header is not a file you can see in your project, but is automatically generated in the build chain. That is, the compiler creates it as a temporary file prior to compiling your Objective-C. Even still, you have to #import it and if Xcode complains that it isn’t available you either don’t have Defines Module set to YES, or you named the header incorrectly (it is productModuleName-Swift.h, where productModuleName is your product module name), or (and here’s the irritating part) you added a Swift file to your project prior to setting Defines Module to YES.
The Swift Class Definition
Trying to use only @objc as an indicator that you’re going to use the Swift class in Objective-C code results in ARC complaints about alloc not being defined. Here’s a screenshot of declaring our Swift class like this:
|
1 2 3 4 5 6 7 8 9 |
import Foundation @objc class SwiftClass { init() { println("SwiftClass init") } } |
Unfortunately we cannot compile due to the annoying No known class method for selector 'alloc' error:

Changing our class to:
|
1 2 3 4 5 6 7 8 9 10 |
import Foundation class SwiftClass : NSObject { override init() { super.init() println("SwiftClass init") } } |
and the compilation proceeds and we can access our Swift class.
From there things proceeded relatively well. Our final test included the following Swift code:
|
1 2 3 4 5 6 7 8 9 10 11 12 13 14 15 16 17 18 19 20 21 22 23 24 25 26 27 28 29 30 31 32 |
import Foundation class SwiftClass : NSObject { override init() { super.init() println("SwiftClass init") } func sayHello() -> Void { println("hello"); } func addX(x:Int, andY y:Int) -> Int { return x+y } // Make a dictionary // No, this code doesn't protect against values.count > keys.count func dictionaryWithKeys(keys:[String], andValues values:[String]) -> Dictionary<String,String> { var dictionary = Dictionary<String,String>() for var i = 0; i < keys.count; i++ { dictionary[keys[i]] = values[i] } return dictionary } } |
with our delegate header including
|
1 |
#import <testing-Swift.h> |
and using it in our Objective-C application delegate:
|
1 2 3 4 5 6 7 8 9 10 11 12 13 14 15 16 |
- (BOOL)application:(UIApplication *)application didFinishLaunchingWithOptions:(NSDictionary *)launchOptions { SwiftClass* mySwiftClass = [[SwiftClass alloc]init]; [mySwiftClass sayHello]; int result = [mySwiftClass addX:5 andY:5]; NSLog(@"5 + 5 is %d", result); NSDictionary* dictionary = [mySwiftClass dictionaryWithKeys:@[@"key1",@"key2",@"key3"] andValues:@[@"val1",@"val2",@"val3"]]; NSLog(@"dictionary = %@", dictionary); return YES; } |
As expected, our output:
|
1 2 3 4 5 6 7 8 |
SwiftClass init hello 2014-11-26 16:43:28.900 testing[6536:1258140] 5 + 5 is 10 2014-11-26 16:43:28.928 testing[6536:1258140] dictionary = { key1 = val1; key2 = val2; key3 = val3; } |
Conclusion
If you can’t get Swift classes mixed into your Objective-C code on your first attempt, you’re aren’t an idiot. Future versions of Xcode one would hope will fix the annoying feature of failing to generate a -Swift.h header file if you didn’t do things in exactly the right order. In the meantime, follow these steps and definitely pore back over the Stackoverflow thread in case you missed something.