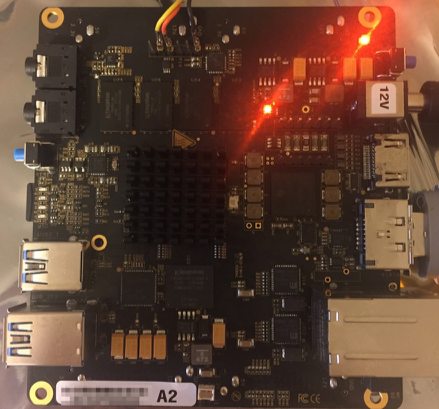
First things first, don’t call it the BeagleBone X15! This is a BeagleBoard. Affectionately named “The Beast” by its creators, the BeagleBoard X15 is a powerful ARM-based desktop computing/multimedia device. With an MSRP of $239 it provides more CPU horsepower, more RAM, and a large assortment of IO peripherals.
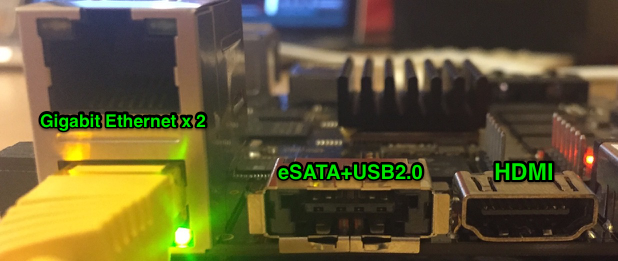
For example, the BeagleBone Black comes with a single USB2.0 port. The X15 is equipped with 3 USB 3.0 host ports, 1 USB 2.0 host port, and 1 USB 2.0 client port. In addition while devices such as Raspberry Pi and Black have a single 10/100 Ethernet connector, the X15 comes with 2 Gigabit RJ45 ports. When you’re moving data across the network (say, downloading the Linux kernel or copying release image files), that extra bandwidth comes in quite handy.
But wait, there’s more! The X15 comes packed with a lot of computing power thanks to its Texas Instruments Sitara AM5728 dual-core ARM Cortex-A15 clocked at 1.5GHz. Combine that with 2GB of RAM and you’ve got a beefy little machine.
But enough about the precise specifications, you can read all of those here. Let’s make sure we talk about what the BeagleBoard X15 is not. It isn’t a Raspberry Pi and it isn’t a BeagleBone Black, and it definitely isn’t an Arduino. What you won’t find on this board are GPIO headers to turn LEDs off and on, run lines out to play with SPI or I2C devices, or connect capes (also referred to as shields by the Arduino folks). There are expansion slots available on the underside of the board which can be used to add PCIe, LCD, and mSATA connections, but the design as it stands doesn’t appear to be for quickly prototyping circuits like with Arduino, Pi, and BeagleBone.
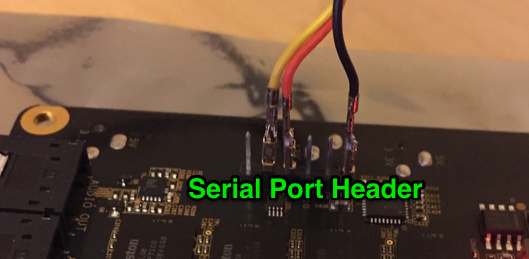
Serial Console
The X15 does have a standard serial port header for connecting something like a Serial FTDI cable. The ground (black) pin is towards the 12V barrel connector. The standard serial connection settings 115200,8,N,1 apply. Having this connection is handy if you are working with the X15 boot loader U-Boot.
USB2.0 Port
There’s also a USB 2.0 port hiding next to the Ethernet connector. It’s actually a eSATA/USB hybrid port, so if you need to connect another USB device and don’t need the eSATA port, connect it here.
Flashing the X15
Like the BeagleBone and other ARM development boards, the X15 also comes with a 4GB eMMC so you can flash a bootable image to it. To do so, head over to the X15 Weekly builds and download an image. The process for flashing the X15 is similar to that of the BeagleBone Black.
Although there are two images (flasher and non-flasher) posted, they are the same with one exception: the contents of /boot/uEnv.txt. The flasher image has the following in its uEnv.txt:
|
1 2 3 4 5 6 |
uname_r=4.1.13-ti-r33 cmdline=coherent_pool=1M quiet #In the event of edid real failures, uncomment this next line: #cmdline=coherent_pool=1M quiet video=HDMI-A-1:1024x768@60e ##enable Generic eMMC Flasher: cmdline=init=/opt/scripts/tools/eMMC/init-eMMC-flasher-v3.sh |
As with the BeagleBone, you can turn a non-flasher load into a flasher by uncommenting the cmdline=init=/opt/scripts/tools/eMMC/init-eMMC-flasher-v3.sh line in /boot/uEnv.txt. I highly recommend you cabling up to the serial port if you make it a habit of flashing your board; it greatly aids in debugging and learning how the flashing process works.
Benchmarks
Now let’s turn to everyone’s favorite method of determining the capabilities of a new computing device, benchmarks. I’m going to be using the sysbench application and running a CPU test for the BeagleBoard X15, BeagleBone Black, and a Wandboard Quad. The sysbench CPU test verifies prime numbers using the trial division method. By default it will verify primes up to 10,000.
| System | –num-threads | total time | total time taken by event execution |
|---|---|---|---|
| BeagleBone Black | 1 | 286.4899s | 286.4704 |
| BeagleBoard X15 | 1 | 112.2594s | 112.2518 |
| Wandboard Quad | 1 | 228.2226s | 228.2110 |
| BeagleBoard X15 | 2 | 56.5488s | 113.0862 |
| Wandboard Quad | 4 | 57.1758s | 228.6204 |
Now I will confess, I always have to take a moment and reread the definition of “total time taken by event execution”. When the number of threads equals 1 total time and total time taken by event execution should be roughly the same. For multicore systems one should utilize the cores by specifying the number of threads to be the same as the number of cores. So, for the X15, we use 2 threads, and likewise, for the Wandboard Quad, we use 4. The results are interesting in that the X15 doesn’t really perform much better than the Wandboard Quad for this benchmark when all cores are utilized. You can see however that one X15 core head-to-head with one Wandboard Quad core, the Cortex-A15 performs much better than the A9.
This is, of course, all academic and doesn’t represent a real-world test. Next up, let’s look at compiling with the X15!
Compiling with the X15
If you’ve ever tried cross-compiling for an ARM-based system, you know first hand it’s less than ideal. Getting a cross-compiling toolchain, building it, ensuring you have all of the right libraries on your host system to compile for the target. Though we’ve been cross-compiling for decades, it is still a pain. So along comes a device like the BeagleBone Black and you think, hey, I could compile my ARM binaries with this! Yes, you could, but you could also get from New York to LA on horseback. The fact is for compiling, both the RaspberryPi, BeagleBone Black, and other “credit-card sized” computers are woefully inadequate for the task.
When originally faced with having to frequently compile ARM packages, whether they be the Linux kernel or something like OpenCV, I turned to the Wandboard QUAD. Make no mistake, this board is no slouch. With a quadcore Cortex-A9 processor the Wandboard Quad is certainly going to have an easier time compiling than a Raspberry Pi or a BeagleBone Black. In fact, it’s a good reference to benchmark against the X15.
Unfortunately it’s a little difficult to get a side-by-side comparison with the Wandboard Quad because of the differences in IO. For example, let’s say we compiled OpenCV on the Quad with the source being on an NFS mount. Well, the Quad has only 100Mb Ethernet, whereas the X15 has 1000Mb. This in and of itself can make a difference. If we compiled the code onto a USB flash drive, the Quad is limited to USB2.0 vs. the X15s USB3.0.
Rather than wring our hands over getting an apples to apples comparison we’re going to use the MicroSD filesystem on the Quad and write to a Class10 microSD on the X15. It should be noted here that both SD cards are Class 10 “high speed” cards.
Our benchmark is going to be straightforward, taking time of make on both systems. For the Quad we’ll use make -j4, and for the X15 we’ll use make -j2. Neither system is running anything taxing in the background, but we didn’t go and specifically turn off every background daemon. No one does that in the real world so why hold up a benchmark that is contrived?
The verdict? The dual-core X15 compiled OpenCV 3.0.0 in 40 minutes compared to around 49 minutes with the Wandboard Quad. Now, this was with compiling on the X15 on the microSD card. I switched the X15 over to using a USB3.0 mass storage drive and compiled OpenCV from scratch in about 36 minutes. As someone who has, in previous lives, been responsible for managing the builds of multiple environments, I can say that every minute you can shave off makes a big difference in your release cycle velocity. Invest in a lot of cores and the fastest disk you can afford, preferably SSD!
What About Other Uses?
Q. How’s the performance as a desktop environment? Can I run LibreOffice and Gimp?
A. I have been using the BeagleBoard X15 as a headless build server, and will likely continue to do so.
Q. What about running Android?
A. I know some folks use these higher-end ARM boards for Android development. I haven’t done enough Android development to write with any authority on the X15’s suitability. I have to believe given the horsepower the 1.5GHz Cortex-A15 brings though it should be a great platform for Android development.
Q. What about the PRUs and DSPs?
A. Confession time: I’ve never used the programmable realtime units (PRUs) on the BeagleBone Black, and I haven’t had any need for DSP processing in my applications. However if you do have a need, the X15 has you covered with:
- 4 PRUs
- 2 TI C66x DSPs
With these capabilities the X15 is sure to find its way into automation controls, signal acquisition, audiovisual compression and processing applications, and anything else that benefits from these subsystems.
It’s Getting Toasty in Here
Due to the laws of physics there’s a price to pay for the extra power packed into the X15: heat. This board gets hot. In fact, the processor itself sits underneath a heat sink, and the board was designed to accommodate a fan.
If you install the lm-sensors package you can run sensors and view several thermal management attributes:
- the status of the fan
- the temperature as reported by the OMAP I2C temperature sensor
- the temperature as reported by the DSPEVE and IVA thermal zones
Without a fan of some sort the I2C temperature sensor hovers around 57-60 C while the CPU is, for the most part, idle. However, once you crank up the workload it can quickly soar! In this graph the CPU was idle and then I built OpenCV utilizing make -j2:
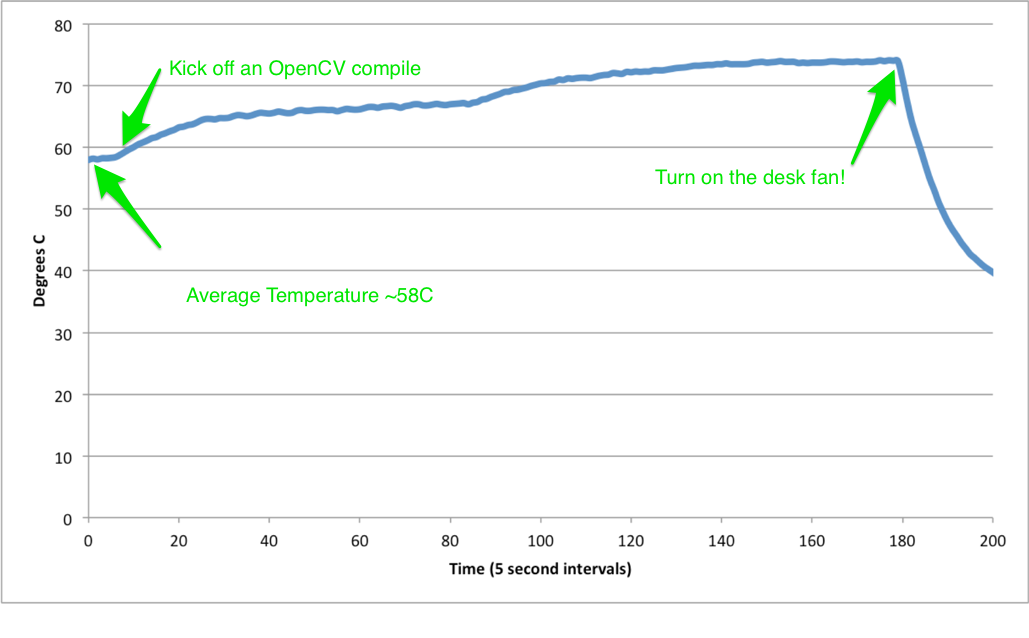
Once the CPU reached 75 C I hit the switch on a little desk fan. This serves to cool it down to around 35 C even under 100% CPU utilization.
It remains to be seen the types of enclosures that will be developed for the X15. If you’re using it on your desk as a build machine there’s probably no need for one. But when using this board let’s just say, don’t touch the heat sink if you aren’t cooling it off with something.
Final Thoughts
The BeagleBoard X15 is an impressive system that packs a punch in terms of CPU, RAM, and IO peripheral support. Combine that with its additional digital signal processing capabilities and programmable real-time units, and it is sure to find its way into a lot of applications. For myself, I’ve been using it for compiling software packages and couldn’t be happier. Plus, I’m itching to get a Swift on the BeagleBone! post written.