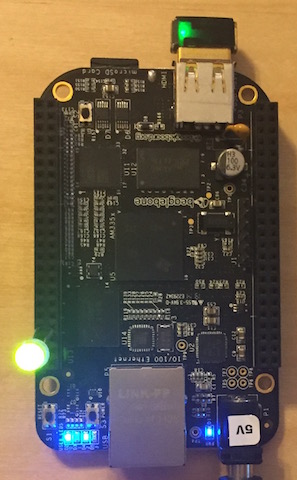
It’s easy to roll your own wireless router with hostapd or OpenWRT and a BeagleBone Black and USB Wifi Adapter Dongle. In this post we’re going to roll our own Wifi AP stability tester. To follow along at home you’ll need a:
- BeagleBone Black
- Wifi USB Adapter
- a tri-color LED
You will also need a microSD card and adapter so you can flash the final image on your BeagleBone. Note: We’ll use the term BeagleBone with a cavalier attitude, but we mean BeagleBone Black.
To build our Wifi AP tester, We went with a TP-LINK Nano adapter:

And for the tri-color LED we picked up a Linrose Super Brite LED, Linrose part number B4361H1/5.

Preparing Your BeagleBone Black
We’re going to keep the OS simple and go with the latest console release of Debian 8.2 for the BeagleBone Black. The full release contains a desktop environment and we just don’t need that for something this simple.
Grab a release with something like:
|
1 |
wget https://rcn-ee.com/rootfs/bb.org/testing/2015-10-25/console/bone-debian-8.2-console-armhf-2015-10-25-2gb.img.xz |
and then write it out to your miniSD card where YOUR_DEVICE will be displayed in dmesg after inserting your SD card. Remember: dd is an acronym for disk destroyer so treat it with respect and make sure you have the right device.
|
1 2 3 4 |
$ xzcat bone-debian-8.2-console-armhf-2015-10-25-2gb.img.xz|sudo dd of=/dev/YOUR_DEVICE bs=8M 0+137064 records in 0+137064 records out 1782579200 bytes (1.8 GB) copied, 144.855 s, 12.3 MB/s |
Note: This page is the place to go to find the latest on Debian builds for BeagleBone Black.
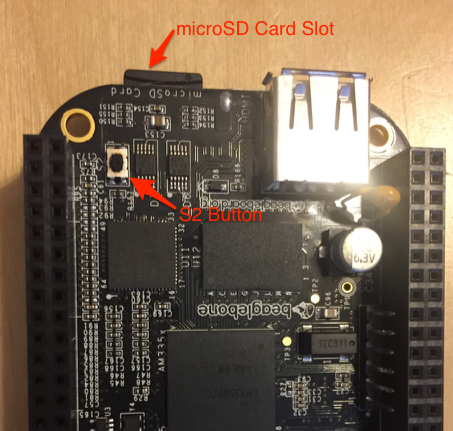
Cable up your BeagleBone Black to your router via Ethernet. Pop the miniSD into your BeagleBone Black and press and hold the S2 button on the Black, and then apply power.
Once the device boots ssh into it:
|
1 2 3 4 5 6 7 8 9 |
Debian GNU/Linux 8 BeagleBoard.org Debian Image 2015-10-25 Support/FAQ: http://elinux.org/Beagleboard:BeagleBoneBlack_Debian default username:password is [debian:temppwd] root@beaglebone:~# |
We’ve logged in as root here to speed things up. Feel free to use the debian user and insert sudo where necessary.
Software Prerequisites
Now we need to get our BeagleBone in shape to do a little hacking. Because we chose a barebones distribution image there are a few dependencies and “fix-ups” to do. Go ahead and run:
|
1 2 |
apt-get update apt-get install -y git build-essential python cpanminus wireless-tools firmware-realtek wpasupplicant |
Now, why we installed all this stuff:
gitbecause we’re going togit clonea repo containing the code for leveraging Speedtest.net to stress test our Wireless Access Pointbuild-essentialbecause its a meta-package which contains essential packages for building applications, modules, libraries, etc.pythonbecause we’re going to be using Python (speedtest-cli)cpanminusfor using thecpantool down download, compile, and install Perl moduleswireless-tools firmware-realtek wpasupplicantto use our TP-LINK Wireless USB Adapter
If you’re using a Wireless adapter with a chipset other than RealTek, make sure and get the right firmware (apt-cache search wireless firmware helps).
It sounds like a lot, and in some ways it is, but consider the philosophy of building applications by “not reinventing the wheel.” Well, not reinventing the wheel doesn’t mean you don’t need wheels, and all of these packages are the wheels upon which we’ll take a trip.
One final note: the image we’re using doesn’t have locales installed, and so you get this annoying warning like this:
|
1 2 3 4 5 6 7 8 9 10 11 |
perl: warning: Setting locale failed. perl: warning: Please check that your locale settings: LANGUAGE = (unset), LC_ALL = (unset), LC_CTYPE = "en_US.UTF-8", LANG = "en_US.UTF-8" are supported and installed on your system. perl: warning: Falling back to the standard locale ("C"). locale: Cannot set LC_CTYPE to default locale: No such file or directory locale: Cannot set LC_MESSAGES to default locale: No such file or directory locale: Cannot set LC_ALL to default locale: No such file or directory |
You can fix that by installing the locales package and configuring en_US.UTF-8.
|
1 |
apt-get install -y locales && dpkg-reconfigure locales |
Follow the onscreen prompts and select the en_US.UTF-8 locale.
We’re going to hack in Perl and Python today. Yes, you heard me, Perl! We use a few Perl libraries from CPAN (remember, not reinventing wheels here).
|
1 |
cpan install Proc::ProcessTable Proc::Daemon Net::Int::Stats Net::Ifconfig::Wrapper |
cpan will likely ask Would you like to configure as much as possible automatically? [yes]. Hit Enter to accept the default yes.
When prompted Is Net::Ifconfig::Wrapper info output correct? Y/N: verify that the eth0 entry looks good and answer (it should be).
Wifi
Use iwconfig to make sure your Wifi adapter is visible.
|
1 2 3 4 5 6 7 8 9 10 |
root@beaglebone:~# iwconfig wlan0 unassociated Nickname:"<WIFI@REALTEK>" Mode:Auto Frequency=2.412 GHz Access Point: Not-Associated Sensitivity:0/0 Retry:off RTS thr:off Fragment thr:off Encryption key:off Power Management:off Link Quality:0 Signal level:0 Noise level:0 Rx invalid nwid:0 Rx invalid crypt:0 Rx invalid frag:0 Tx excessive retries:0 Invalid misc:0 Missed beacon:0 |
To get the wireless interface connected to your AP, edit /etc/network/interfaces and add your SSID and WPA (assuming you’re assuming WPA!) credentials. Make sure and uncomment the Wifi directives:
|
1 2 3 4 5 |
# WiFi Example auto wlan0 iface wlan0 inet dhcp wpa-ssid "YOUR_SSID" wpa-psk "YOUR_PASSWORD" |
While you are in /etc/network/interfaces also change the eth0 entry from auto to allow-hotplug (more on this in a minute) like this:
|
1 2 3 |
# The primary network interface allow-hotplug eth0 iface eth0 inet dhcp |
Run ifup wlan0 to bring up your interface.
|
1 |
root@beaglebone:~# ifup wlan0 |
You should of course see a DHCPDISCOVER message go out followed by REQUEST, OFFER, and ACK.
The SSID you put in /etc/network/interfaces will be the SSID of the AP you intend to test.
Installing bbwifiaptest
Now let’s install our BeagleBone Wifi AP Tester. Grab it from GitHub.
|
1 |
git clone https://github.com/iachievedit/bbwifiaptest.git |
The Perl script bbwifiaptest.pl is where the magic happens, and is what will be launched when we install the app as a service.
By default the script is designed to daemonize itself, but you can bypass this with --no-daemon on the command line. To start, try:
|
1 |
./bbwifiaptest.pl --no-daemon --log-console |
You should see something like:
|
1 2 3 4 5 6 7 8 9 10 11 |
Sun Nov 1 15:07:29 2015: [I] ENTRY Sun Nov 1 15:07:29 2015: [I] START Sun Nov 1 15:07:29 2015: [I] Using speedtest-cli at /root/bbonewifiaptester/speedtest-cli Sun Nov 1 15:07:29 2015: [I] wlan0 RX bytes:1977134453 Sun Nov 1 15:07:29 2015: [I] wlan0 TX bytes:9080413 Sun Nov 1 15:07:56 2015: [I] Download Speed: 45.62 Mbit/s Sun Nov 1 15:07:56 2015: [I] wlan0 RX bytes:2103578223 Sun Nov 1 15:07:56 2015: [I] wlan0 TX bytes:9084287 Sun Nov 1 15:08:18 2015: [I] Download Speed: 45.90 Mbit/s Sun Nov 1 15:08:18 2015: [I] wlan0 RX bytes:2204566330 Sun Nov 1 15:08:18 2015: [I] wlan0 TX bytes:9088091 |
You’re seeing the script use speedtest-cli to test the bandwidth of the connection and then display the statistics of the wlan0 interface. If we cannot reach Speedtest.net for whatever reason (presumably the AP is no longer routing us to the Internet) the script will retry 10 times and then give up.
Of course, our plan is to get a visual indication that the AP is available, so we’ll turn to our LED!
Lite-Brite!
Disclaimer: we’re not hardware heads over at iAchieved.it. If you feel there should be a current-limiting resistor for the LED, by all means, wire one up.
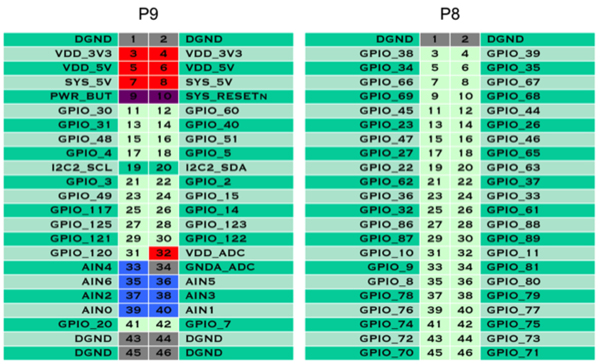
Now that we can run the bbwifiaptest script we need to plug in our tri-color LED. We’re using GPIO 66 and 67 which correspond to pins 7 and 8 on the P8 header of the BeagleBone Black. The cathode for the Linrose B4361H1/5 (the end that goes to ground) is the center pin and should be put in pin 1 or 2 of the P8 header, and the longer of the two anodes should be put in pin 7 of the P8 header. The shorter anode (red) should go in pin 8.
Our color codes are as follows:
- Green – speedtest.net is reachable and we’re downloading from it
- Orange – speedtest.net is not available but we haven’t given up trying to contact it
- Red – something is wrong and we’ve given up
An orange light can persist for up to a little over 6 minutes as the script patiently waits for the AP to come back online. After that it’s lights out.
Installing the Service and Testing
Now let’s install the application and set the BeagleBone to start it upon boot. Run the supplied install.sh script:
|
1 2 |
root@beaglebone:~/bbonewifiaptester# ./install.sh Created symlink from /etc/systemd/system/multi-user.target.wants/bbwifiaptest.service to /etc/systemd/system/bbwifiaptest.service. |
This script puts the speedtest-cli and bbwifiaptest.pl applications in /usr/local/bin and then enables a systemd daemon to start it once the network is available.
To test this you will need to:
- have the LED plugged in
- have the miniSD card plugged in
Log out of the BeagleBone, disconnect the Ethernet cable (we’re going to be running only on the Wifi dongle), and then press and hold the S2 button. While holding S2 down, press (but don’t hold) the Reset button (S1) on the BeagleBone. You can release S2 button after the blue LEDs start flashing. Be patient as the system boots – the LED will remain off until the Wifi connection is established and systemd starts the application. It will take about 30 seconds. One could get clever and create a prerequisite service that flashes the LED orange while the boot sequence is running.

Remember when we changed eth0 from auto to allow-hotplug? This drastically reduces our boot time as systemd won’t sit around and wait for the Ethernet interface to come up (which it won’t). We do want it to wait for wlan0 which is why that is left to auto.
Look Ma, No Hands!
Remember up above where we had to press the S2 button to ensure the BeagleBone Black boots off of the microSD card? Well, if you ever pulled power in the tutorial above and forgot to press it again, you’re booting off of the onboard eMMC (which you can think of as a microSD card thats permanently soldered to the BeagleBone). When using our AP tester we don’t want to go around having to remember to press S2, so let’s flash our image to the eMMC. Warning: If you have something on the BeagleBone Black eMMC that you want to keep make sure and copy it off now! The next steps will erase whatever was there.
First, log in and go to /boot/uEnv.txt and go down to the bottom. You should see:
|
1 2 3 |
##enable Generic eMMC Flasher: ##make sure, these tools are installed: dosfstools rsync #cmdline=init=/opt/scripts/tools/eMMC/init-eMMC-flasher-v3.sh |
Heed the warning here about dosfstools and rsync and make sure they are installed (they should be). Then, uncomment the cmdline entry and reboot while holding down S2. Wait until all four of the LEDs next to the Ethernet connector light up, and then you can release S2. You should then see the LEDs light up in sequence back-and-forth, like this:
[youtube]https://www.youtube.com/watch?v=o885-0BmEpo[/youtube]
Once the flashing is complete the LEDs will go solid again. Disconnect power, pop out the microSD card, and then reapply power. Within 30 seconds or so you should see the green LED!
Now What?
Now you have a Wifi AP tester! Take your BeagleBone Black and locate it where ever you like in relation to your AP and power it on. If the device connects to the AP and begins downloading traffic you’ll see the green light. If it doesn’t light up at all you know something failed horribly and should reconnect the BeagleBone via Ethernet and take a look at the logs.
If you see the LED turn red after some time it means traffic was no longer getting out to the Internet. That is, for some reason, the AP stopped passing traffic. Again, turn off the device, cable it up, and take a look at the logs. You will be able to see when “traffic runs” started by the ENTRY and EXIT markers. You will want to write some post-processing script to generate reports about the data.
Command Line Options
The bbwifiaptest.pl script has a number of command-line options.
| Option | Description |
|---|---|
--logfile LOGFILE |
Write logs to LOGFILE (default is /var/log/bbwifiaptest.log) |
--speedtest SCRIPT |
Use SCRIPT for the speedtest-cli script. |
--wirelessif WIRELESS_IF |
Use WIRELESS_IF as the wireless interface to monitor. Default is wlan0. |
--no-daemon |
Don’t daemonize. By default the script will run as a daemon. |
--log-console |
Display logs on the console. By default logs are only written to the logfile. |
Next Steps
There’s so many things that can be improved here to make a sturdy little Wifi AP tester. Think multiline character displays with more status information, writing logs to the SD card, providing a web interface on port 80 to see what’s going on. You will also notice that the script isn’t designed to run while the Ethernet is plugged in – the green LED will come on because eth0 is passing traffic. We need to update the script to onlyuse Wifi.
We might make these changes and blog about them, but don’t wait on us, get hacking today! Finally, if you enjoyed this article make sure and follow @iachievedit on Twitter!


