In late March 2020 Apple purchased the Dark Sky app, and along with it the Dark Sky API. No longer accepting sign ups the Dark Sky API will go offline on March 31, 2023. If you’re a developer that needs a reliable weather API, Apple is now providing WeatherKit. Typical “Kit” APIs are only available on Apple devices as libraries, but in this case, WeatherKit does have a REST web service available. Let’s look at how to use it.
The WeatherKit API does require an Apple developer account and access to the Developer Console to configure. Though the developer account costs $99 a year, that includes 500,000 WeatherKit API calls per month. For me personally that is a much better deal than a service such as a AccuWeather or OpenWeather.
Provisioning
To get started with WeatherKit we need to do some provisioning in the Developer Console. The first step will be to create a key.
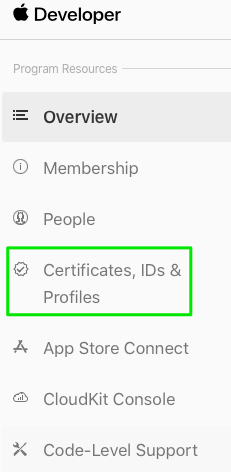
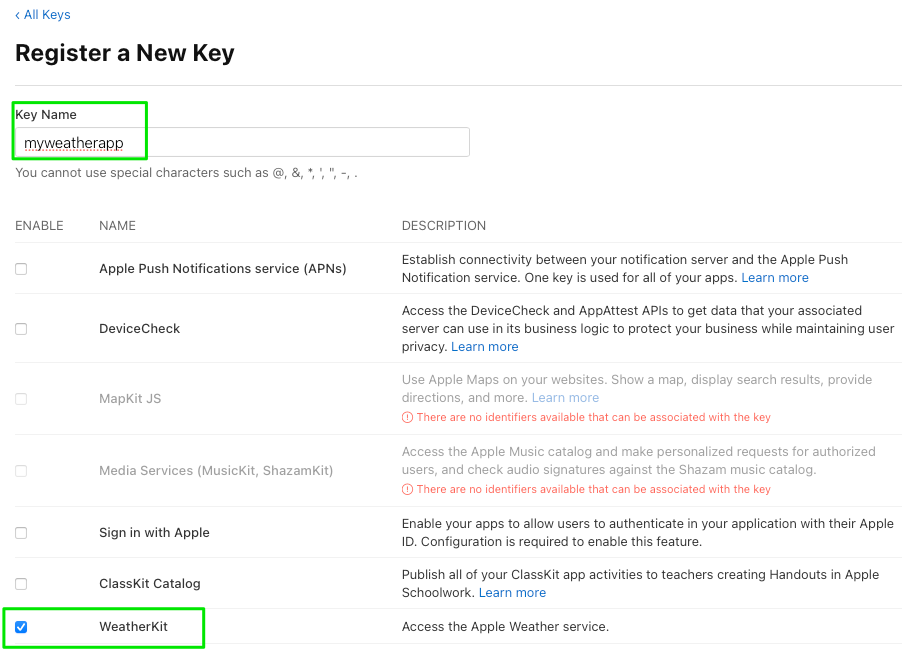
Select Certificates, Identifiers & Profiles and then Keys. Click the blue circle with white cross to add a new key. We’ll call the key myweatherapp. Check the box next to WeatherKit.
Click Continue and then Register on the Register a New Key screen.
Make note on this screen that you’re about to download a new key, and once you’ve done so you won’t be able to again. This key is necessary to access the WeatherKit REST API (you’ll be signing tokens with it), so keep it in a safe place.
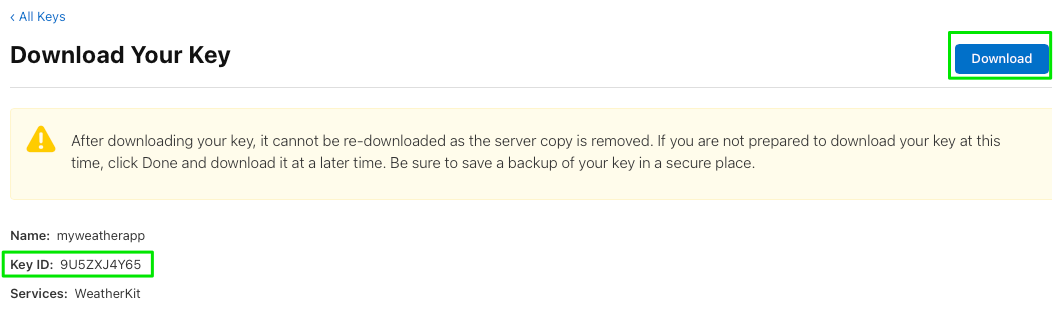
Download your key, and also make note of the Key ID. We’re going to use it later. Look in your Downloads folder for AuthKey_KEYID.p8. In our case the filename is AuthKey_9U5ZXJ4Y65.p8.
Once you’ve downloaded your key, click Done.
Now that we have our key, it’s time to provision our service identifier. Click on Identifiers and once again, the blue circle with white cross. Choose Services ID and Continue.
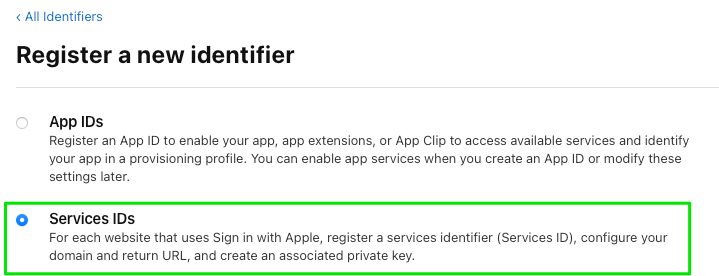
We’re going to use the reverse domain name notation for the service, i.e., it.iachieved.myweatherapp.
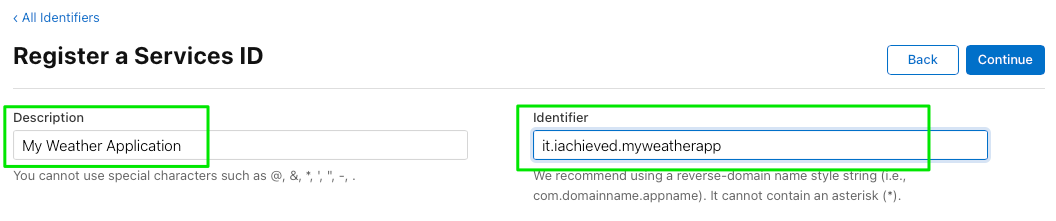
Click Continue and then Register.
Preparing the Keys
The .p8 file downloaded is a plain text file containing an elliptic curve private key in PKCS#8 format. It is not encrypted. We’re going to want the key in PEM format, so let’s convert it with openssl:
|
1 |
openssl pkcs8 -nocrypt -in AuthKey_9U5ZXJ4Y65.p8 -out AuthKey_9U5ZXJ4Y65.pem |
NB: The option -nocrypt is required!
We need the public key component as well for signing JWT tokens, so obtain it with openssl:
|
1 |
openssl ec -in AuthKey_9U5ZXJ4Y65.pem -pubout > AuthKey_9U5ZXJ4Y65.pub |
You should now have two files which are the private and public key.
Creating and Signing a JWT
Let’s recall how accessing a REST API with a JSON Web Token works.
Apple runs the WeatherKit API service, and in the Developer console you created a key. Apple kept a copy of the public key which it will use to verify JWT signatures. Your application is going to construct a JWT and sign it with the private key. This signed JWT will be presented as a bearer token to the API. If Apple can validate your signature and that your token contents identify provisioned WeatherKit services, you’re golden.
We’ll use jwt.io to create a JWT by hand.
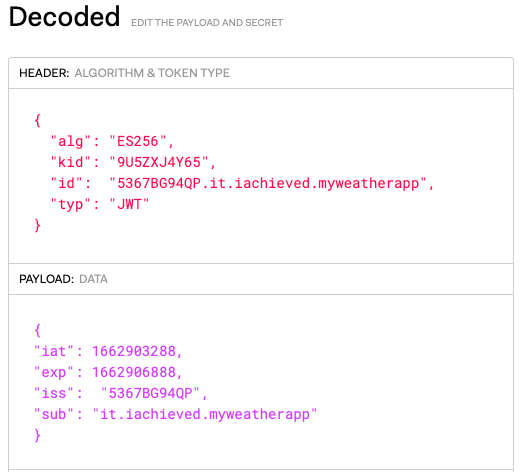
The JWT to access the WeatherKit API must contain the following header elements:
- alg – ES256
- kid – the Key ID obtained when creating your key
- id – your Developer Account Team ID concatenated with a period, and then your Services Identifier (the reverse domain name)
- typ – JWT
The JWT payload must contain the following:
- iss – your Developer Account Team ID
- sub – the Services identifier (the reverse domain name)
- iat – the standard “issued at” timestamp in Unix epoch time
- exp – an expiration timestamp in Unix epoch time
Here is an example in jwt.io:
When I need a quick copy-paste of the iat and exp I use this Python one-liner:
|
1 |
python -c'import time; n=int(time.time()); print("\\"iat\\": %d," % n); print("\\"exp\\": %d," % (n+3600))' |
Once you’ve constructed your token’s contents it’s time to sign it. In jwt.io this is accomplished by pasting the public and private key contents into the Verify Signature inputs.
If successful, you should see something like:
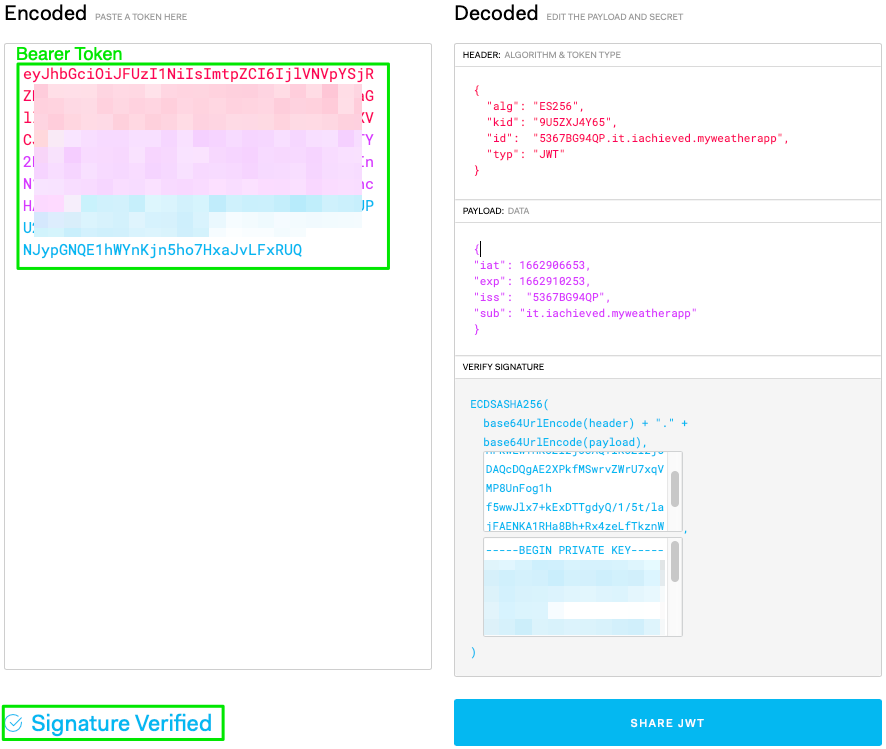
The encoded and signed token is your bearer token that is presented to the WeatherKit API for authentication and authorization. Note the contents of the private key and the bearer token were blurred, but the JWT contents were not. You can construct the same contents, but unless they’re signed with the private key of our provisioned service they’re unusable. Thus it is important to keep your private key private!
Calling the API
With a bearer token in hand you can make calls to the WeatherKit API!
The first call we’ll make is to determine what WeatherKit API services are available for the GPS location 32.779167/-96.808891, which happens to be Dallas, Texas. In these examples <TOKEN> should be replaced with the bearer token.
|
1 |
curl "https://weatherkit.apple.com/api/v1/availability/32.779167/-96.808891?country=US" -H 'Authorization: Bearer <TOKEN>' |
This returns:
|
1 |
["currentWeather","forecastDaily","forecastHourly","forecastNextHour","weatherAlerts"] |
In other words, for this location, we can obtain the current weather, daily forecast, hourly forecast, forecast for the next hour, and weather alerts. We’ll just check the current weather.
|
1 2 |
curl "https://weatherkit.apple.com/api/v1/weather/en_US/32.779167/-96.808891?dataSets=currentWeather" \ -H 'Authorization: Bearer <TOKEN>' |
A few things to note here:
- the route changed to
/api/v1/weather/ - the inclusion of a locale code (e.g.,
en_US) - the query parameter
dataSets
The result of the call:
|
1 |
{"currentWeather":{"name":"CurrentWeather","metadata":{"attributionURL":"https://weatherkit.apple.com/legal-attribution.html","expireTime":"2022-09-11T14:57:09Z","latitude":32.779,"longitude":-96.809,"readTime":"2022-09-11T14:52:09Z","reportedTime":"2022-09-11T14:52:09Z","units":"m","version":1},"asOf":"2022-09-11T14:52:09Z","cloudCover":0.41,"conditionCode":"PartlyCloudy","daylight":true,"humidity":0.70,"precipitationIntensity":0.00,"pressure":1021.51,"pressureTrend":"rising","temperature":22.17,"temperatureApparent":22.72,"temperatureDewPoint":16.52,"uvIndex":3,"visibility":26705.41,"windDirection":348,"windGust":30.99,"windSpeed":18.18}} |
The units are returned in metric, and annoyingly the condition code will need to be mapped to make it user friendly (“Partly Cloudy” instead of “PartlyCloudy”).
A C++ JWT Signing Implementation
We used the jwt.io site to quickly cobble together a usable bearer token, but if you’re building an actual application to make requests to the WeatherKit API you’re going to want to implement JWT signing in code.
Here’s an example in C++ utilizing the jwt-cpp header-only library.
|
1 2 3 4 5 6 7 8 9 10 11 12 13 14 15 16 17 18 19 20 21 22 23 24 25 26 27 28 29 30 31 32 33 34 35 |
#include <fstream> #include <sstream> #include <string> #include <jwt-cpp/jwt.h> int main(void) { // Read in private key std::ifstream f("priv.key"); std::stringstream buf; buf << f.rdbuf(); std::string priv_key = buf.str(); // Read in public key f.close(); f.open("pub.key"); buf << f.rdbuf(); std::string pub_key = buf.str(); auto token = jwt::create() .set_issuer("5367BG94QP") .set_type("JWT") .set_key_id("9U5ZXJ4Y65") .set_header_claim("id", jwt::claim(std::string("5367BG94QP.it.iachieved.myweatherapp"))) .set_subject("it.iachieved.myweatherapp") .set_issued_at(std::chrono::system_clock::now()) .set_expires_at(std::chrono::system_clock::now() + std::chrono::seconds {3600}) .sign(jwt::algorithm::es256(pub_key, priv_key)); std::cout << "Bearer " << token << std::endl; return 0; } |
WeatherKit REST API Documentation
The complete REST API documentation for WeatherKit can be found at https://developer.apple.com/documentation/weatherkitrestapi.