I had to create a new category named Hacking for this post. The end result is a Raspberry Pi outfitted with LEDs that will inform me of which network interfaces are activated. If you want to actually recreate what I’ve done you’re going to need:
- a Raspberry Pi with Debian Jessie
- two LEDs and wiring to connect them to the GPIO pins on the Pi
- a Wireless USB Adapter (I’m using a NETGEAR WG111v3)
- an Ethernet connection to the Pi
A few days ago I was researching on Google and started off with this question: How do I get notified if a Linux network connection goes down? The top result on StackOverflow led me down the path of learning about technologies that, quite frankly, I hadn’t explored before. Those being:
Call me old-school, but I teethed on MkLinux and RedHat before there was a distribution called Fedora. /etc/sysconfig/network-scripts and /etc/init.d/network were the only game in town, and I simply hadn’t kept up with the latest in Linux-land.
Getting Started
You’re going to need a Raspberry Pi with Debian Jessie (or rather, Raspbian that is based upon Jessie). Head on over to the Raspbians download page and grab the release based upon Jessie. Hopefully this isn’t your first Raspberry rodeo, but if it is, once the .zip file is downloaded, go ahead and unzip 2015-09-24-raspbian-jessie.img.zip and then insert an SD card into your computer, determine what device it was associated with (hint: dmesg), and then:
|
1 |
dd if=2015-09-24-raspbian-jessie.img of=/dev/DEVICE bs=8M |
Once the dd is complete, insert the SD card into your Raspberry Pi SD slot, connect it to your home router via Ethernet, and power it on. It should be visible shortly via Avahi and you can log in with:
|
1 |
ssh pi@raspberrypi.local |
As usual, the default password for the pi user is raspberry. Verify that you are indeed running Raspbian Jessie:
|
1 2 3 4 5 6 |
pi@raspberrypi ~ $ lsb_release -a No LSB modules are available. Distributor ID: Raspbian Description: Raspbian GNU/Linux 8.0 (jessie) Release: 8.0 Codename: jessie |
From here’s on I’m going to drop to the root user, so if a command fails due to lack of permissions, either sudo su or prepend the command with sudo. If you balk at running as root, see this post explaining why you’re a wimp.
Before proceeding, you might want to also run the following on your Pi:
|
1 |
apt-get -y update && apt-get -y upgrade |
to get the latest and greatest packages for Raspbian.
Installing NetworkManager
We want to manage our network interfaces with NetworkManager, so we need to install it. Now, the question is: why do we want to manage our network interface with NetworkManager? The answer is to take advantage of the messages NetworkManager places on the D-Bus when the status of “network” changes. After working with it a bit, I like to think of D-Bus as the Linux equivalent of the iOS and OS X NSNotificationCenter. When I want to listen for broadcasted events I subscribe to be notified when said events occur.
Let’s install NetworkManager then with:
|
1 |
apt-get install -y network-manager |
While NetworkManager is installing, watch the console output. You’ll see at some point:
|
1 2 3 4 5 6 7 8 |
Setting up network-manager (0.9.10.0-7) ... The following network interfaces were found in /etc/network/interfaces which means they are currently configured by ifupdown: - eth0 - wlan0 - wlan1 If you want to manage those interfaces with NetworkManager instead remove their configuration from /etc/network/interfaces. |
Now, this information is key. We are going to go into /etc/network/interfaces and remove a lot of information. Before that, let’s read a bit about how NetworkManager determines whether or not it (rather than something else), is going to manage interfaces.
Okay, three things to do to enable NetworkManager for our interfaces:
- remove interface entries from
/etc/network/interfaces - set
managed=truein/etc/NetworkManager/NetworkManager.conf /etc/init.d/network-manager restart
After this our files look like:
|
1 2 3 4 |
root@raspberrypi:/home/pi# cat /etc/network/interfaces source-directory /etc/network/interfaces.d auto lo iface lo inet loopback |
|
1 2 3 4 5 |
root@raspberrypi:/home/pi# cat /etc/NetworkManager/NetworkManager.conf [main] plugins=ifupdown,keyfile [ifupdown] managed=true |
And then:
|
1 2 3 4 5 6 7 8 |
root@raspberrypi:/home/pi# systemctl restart NetworkManager root@raspberrypi:/home/pi# systemctl status NetworkManager NetworkManager.service - Network Manager Loaded: loaded (/lib/systemd/system/NetworkManager.service; enabled) Active: active (running) since Mon 2015-10-26 02:20:03 UTC; 26s ago Main PID: 4342 (NetworkManager) CGroup: /system.slice/NetworkManager.service 4342 /usr/sbin/NetworkManager --no-daemon |
You will see in the systemd logs that NetworkManager is struggling with wlan0. We’ll fix that momentarily, but first, take a look at your interfaces with nmcli (NetworkManager CLI):
|
1 2 3 4 5 |
root@raspberrypi:/home/pi# nmcli device status DEVICE TYPE STATE CONNECTION eth0 ethernet connected eth0 wlan0 wifi unavailable -- lo loopback unmanaged -- |
So far so good. Our Ethernet device is up and connected (which if it weren’t we would have gotten knocked out of our ssh session).
Configuring WiFi
I will confess that this next part took a little trial and error, but hey, that’s what hacking is all about. Without ever having been exposed to NetworkManager one expects to fiddle with the parameters a bit to make things work. Here we go:
|
1 2 3 4 |
root@raspberrypi:/home/pi# nmcli con add con-name HomeOffice ifname wlan0 type wifi ssid MYSSID Connection 'HomeOffice' (a6ce46a0-c69c-4e4a-8065-43d665702627) successfully added. root@raspberrypi:/home/pi# nmcli con modify HomeOffice wifi-sec.key-mgmt wpa-psk root@raspberrypi:/home/pi# nmcli con modify HomeOffice wifi-sec.psk MYPSK |
Of course, replace MYSSID and MYPSK with your own SSID and pre-shared key.
All of this was sorted out by reading the RedHat documentation.
Before enabling the connection, kill any wpa_supplicant process that may have been hanging out.
|
1 2 3 |
root@raspberrypi:/home/pi# ps aux|grep wpa root 2137 0.2 0.8 7116 1516 ? Ss 02:10 0:02 /sbin/wpa_supplicant -s -B -P /run/wpa_supplicant.wlan0.pid -i wlan0 -D nl80211,wext -c /etc/wpa_supplicant/wpa_supplicant.conf root@raspberrypi:/home/pi# kill -9 2137 |
and then start the connection with nmcli:
|
1 2 |
root@raspberrypi:/home/pi# nmcli con up HomeOffice Connection successfully activated (D-Bus active path: /org/freedesktop/NetworkManager/ActiveConnection/3) |
Using nmcli dev status once more:
|
1 2 3 4 5 |
root@raspberrypi:/home/pi# nmcli dev status DEVICE TYPE STATE CONNECTION eth0 ethernet connected eth0 wlan0 wifi connected HomeOffice lo loopback unmanaged -- |
Very handy indeed.
D-Bus Messages and python-networkmanager
Okay, now we’re getting somewhere! Another new command. On your Pi, run busctl monitor org.freedesktop.NetworkManager. You might see something like:
|
1 2 3 4 5 6 7 8 9 10 11 12 13 |
Type=signal Endian=l Flags=1 Version=1 Priority=0 Cookie=4013 Sender=:1.21 Path=/org/freedesktop/NetworkManager/AccessPoint/1 Interface=org.freedesktop.NetworkManager.AccessPoint Member=PropertiesChanged UniqueName=:1.21 MESSAGE "a{sv}" { ARRAY "{sv}" { DICT_ENTRY "sv" { STRING "Strength"; VARIANT "y" { BYTE 97; }; }; }; }; |
Now, this is neat! It looks like every time the signal strength of the WiFi connection changes there’s a message on the D-Bus. What happens if you pull the WiFi adapter out altogether? Two signals get emitted: AccessPointRemoved and DeviceRemoved, along with additional signals on other paths.
|
1 2 3 4 5 6 7 8 9 10 11 12 13 |
Type=signal Endian=l Flags=1 Version=1 Priority=0 Cookie=4063 Sender=:1.21 Path=/org/freedesktop/NetworkManager/Devices/2 Interface=org.freedesktop.NetworkManager.Device.Wireless Member=AccessPointRemoved UniqueName=:1.21 MESSAGE "o" { OBJECT_PATH "/org/freedesktop/NetworkManager/AccessPoint/2"; }; Type=signal Endian=l Flags=1 Version=1 Priority=0 Cookie=4068 Sender=:1.21 Path=/org/freedesktop/NetworkManager Interface=org.freedesktop.NetworkManager Member=DeviceRemoved UniqueName=:1.21 MESSAGE "o" { OBJECT_PATH "/org/freedesktop/NetworkManager/Devices/2"; }; |
Now, this isn’t necessarily a D-Bus tutorial or complete NetworkManager tutorial, but, you might want to read up on the NetworkManager D-Bus API here.
Recall that the original question that started me down this hacking journey was how to get notified about changes in network availability. Well, reading D-Bus messages from NetworkManager is the answer, but before we tie everything together we’ll install a Python library that is going to make this much easier. That library is python-networkmanager.
|
1 |
root@raspberrypi:/home/pi# easy_install python-networkmanager |
python-networkmanager documentation is a little sparse, but much of the functionality can be gleaned from the examples.
Signals We’re Interested In
After a little trial and error I determined that we’re interested in two NetworkManager signals:
DeviceAddedDeviceRemoved
and we’re interested in the StatusChanged signal for a given device.
This is important! The top-level StatusChanged signal for the NetworkManager is the overall status, and we are interested specifically in status changes for each device.
With python-networkmanager we code this as follows:
|
1 2 3 4 5 6 7 8 9 10 11 12 13 14 15 16 17 18 19 20 21 22 23 |
Devices = {} def main(): NetworkManager.NetworkManager.connect_to_signal('DeviceAdded', device_add_remove, **d_args) NetworkManager.NetworkManager.connect_to_signal('DeviceRemoved', device_add_remove, **d_args) for dev in NetworkManager.NetworkManager.GetDevices(): dev.connect_to_signal('StateChanged', device_state_change, **d_args) connectionType = type(dev.SpecificDevice()).__name__ Devices[dev.object_path] = {} Devices[dev.object_path]["type"] = connectionType if connectionType == "Wired" and \ NetworkManager.const('device_state',dev.State) == "activated": Devices[dev.object_path]["active"] = True ethernet(True) if connectionType == "Wireless" and \ NetworkManager.const('device_state',dev.State) == "activated": Devices[dev.object_path]["active"] = True wifi(True) |
First, we “connect” (or subscribe) to the DeviceAdded and DeviceRemoved signals. The second argument to connect_to_signal is a callback, which we’ll define later on. Next, we use the GetDevices() method to give us all of the current devices.
For each device we connect to the StateChanged signal. This is how we’ll know whether there was a state change for that specific device. Then, using the python-networkmanager API we get the type of connection (Wired, Wireless, etc.), and determine whether NetworkManager reports the connection as activated (i.e., up and with an address). If all is well we stash this information in our Devices table and call something like ethernet(True) (more on this later).
Now, for a look at our add/remove and state change functions:
|
1 2 3 4 5 6 7 8 9 10 11 12 13 14 15 16 17 18 19 20 21 22 23 24 25 26 27 28 29 30 31 32 33 34 35 36 37 38 39 40 41 42 43 44 45 46 |
def device_add_remove(*args, **kwargs): msg = kwargs['d_member'] if msg == "DeviceAdded": # Argument will be the device, which we want to monitor now args[0].connect_to_signal('StateChanged', device_state_change, **d_args) return if msg == "DeviceRemoved": print "Device removed: %s" % (args[0].object_path) if args[0].object_path in Devices: del args[0].object_path def device_state_change(*args, **kwargs): msg = kwargs['d_member'] path = kwargs['d_path'] print "Device state change: %s" % (path) print "Old state: %s" % NetworkManager.const('device_state', args[1]) print "New state: %s" % NetworkManager.const('device_state', args[0]) device = NetworkManager.Device(path) newState = NetworkManager.const('device_state', args[0]) try: connectionType = type(device.SpecificDevice()).__name__ except: # D-Bus likely doesn't know about the device any longer, # this is typically a removable Wifi stick path = kwargs['d_path'] if path in Devices: connectionType = Devices[path]["type"] if newState == "activated": path = kwargs['d_path'] print "Device activated: %s" % (path) Devices[path] = {"type": connectionType, "active": True} if connectionType == "Wired": ethernet(True) if connectionType == "Wireless": wifi(True) else: if connectionType == "Wired": ethernet(False) if connectionType == "Wireless": wifi(False) |
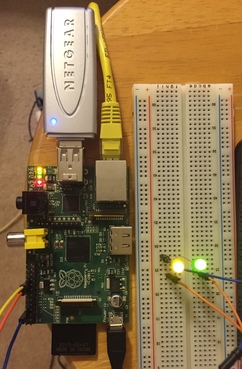
Work through this code on your own; hopefully it isn’t too obtuse, but to be fair, none of this will run without filling in the gaps. Like, what does ethernet do? Fear not, the entire code resides in a single file called watchnet.py. Here you will find the ethernet and wifi functions, which simply raise/lower GPIO pins. If you have the GPIO pins connected to LEDs you get a nice visual display of what interface is up/down at the moment. In the first pic both LEDs are lit, thus indicating that both the Ethernet and WiFi connections are up.
In the second pic I’ve removed the Wireless USB Adapter, and the yellow LED goes out.
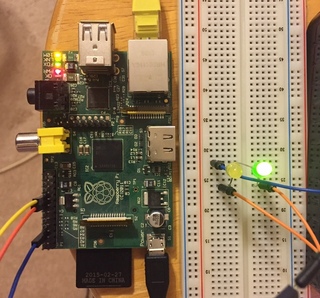
I am using GPIO pins 23 and 24 on the Raspberry Pi and carrying them out to a green and yellow LED. If you’ve never used the Pi to drive LEDs, have a look at this tutorial, but realize I am using the /sys/class/gpio “method” of setting the pins, and my circuit omits the resistors (I like to live dangerously).
Life cycle of the Wired and Wireless Devices
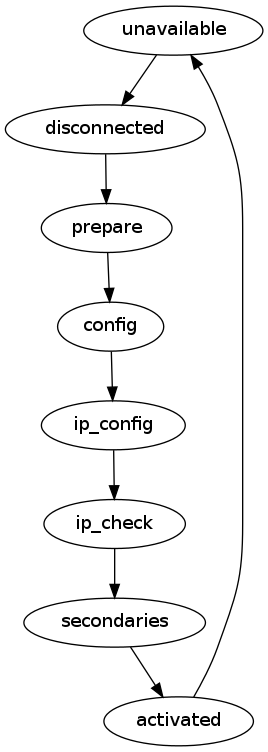
Now, I’m by no means an expert on NetworkManager and I’m sure there may be some additional states lurking in the machine that I haven’t seen, but what I can gather here is what you should expect for a “normal” sequence for both a Wired and Wireless device:
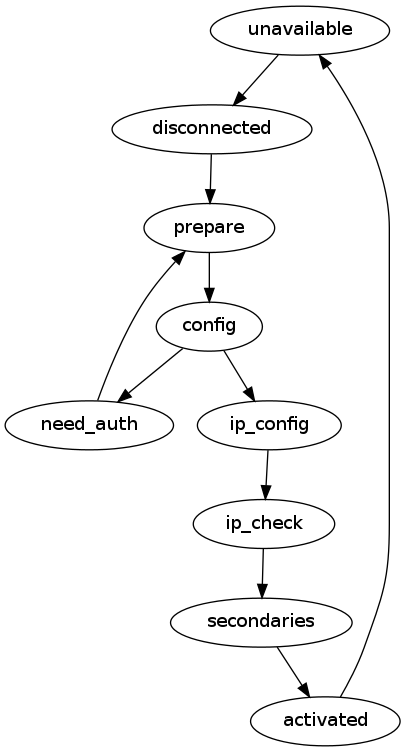
In contrast, a Wireless device has some additional steps to obtain credentials for the connection:
If you don’t have any LEDs lying around (what kind of hacker are you?!) run the watchnet.py script in the foreground and take note of the logs:
|
1 2 3 4 5 6 7 8 9 10 11 12 |
pi@raspberrypi ~ $ ./watchnet.py Device state change: /org/freedesktop/NetworkManager/Devices/3 Old state: activated New state: unmanaged Device removed: /org/freedesktop/NetworkManager/Devices/3 Device state change: /org/freedesktop/NetworkManager/Devices/4 Old state: unavailable New state: disconnected Device state change: /org/freedesktop/NetworkManager/Devices/4 Old state: disconnected New state: prepare ... |
In this example the Wireless USB Adapter was pulled (Device removed, which coincidentally you will not see for pulling an Ethernet cable).
But seriously, it’s more fun with LEDs.
Wrapping It Up
Now, to wrap everything up into a nice “no touch” environment, we turn to writing a systemd unit. In /etc/systemd/system/watchnet.service add the contents:
|
1 2 3 4 5 6 7 8 9 10 11 |
[Unit] Description=WatchNet Wants=NetworkManager-wait-online.service After=NetworkManager-wait-online.service [Service] Type=simple ExecStart=/home/pi/watchnet.py [Install] WantedBy=multi-user.target |
Enable the service:
|
1 2 |
root@raspberrypi:~# systemctl enable watchnet Created symlink from /etc/systemd/system/multi-user.target.wants/watchnet.service to /etc/systemd/system/watchnet.service. |
Of course, make sure watchnet.py is in /home/pi and the execute bit (chmod +x watchnet.py) is set!
Now, for some fun:
- Pull the power to the Pi
- Disconnect all of the network interfaces
- Choose either the Ethernet cable or Wireless USB Adapter and plug it in
The appropriate LED should light up! Plug in the “other” device and its LED will light up as well. So, at a glance, you can see what network interface(s) are connected on your Pi.
Next Time
I’m itching to buy a Adafruit Character LCD for the Pi. Imagine displaying in text various status messages, or changing colors based upon the WiFi signal strength. Next time!

Hi,
i’m following your article.
but …. busctl command is missing in raspbian…how to add?
busctlI believe is included with thesystemdpackage. You may be on a version of Raspbian which is SysVInit-based (in which case you may have to decide whether or not install portions of systemd or switch to a flavor which includes it).